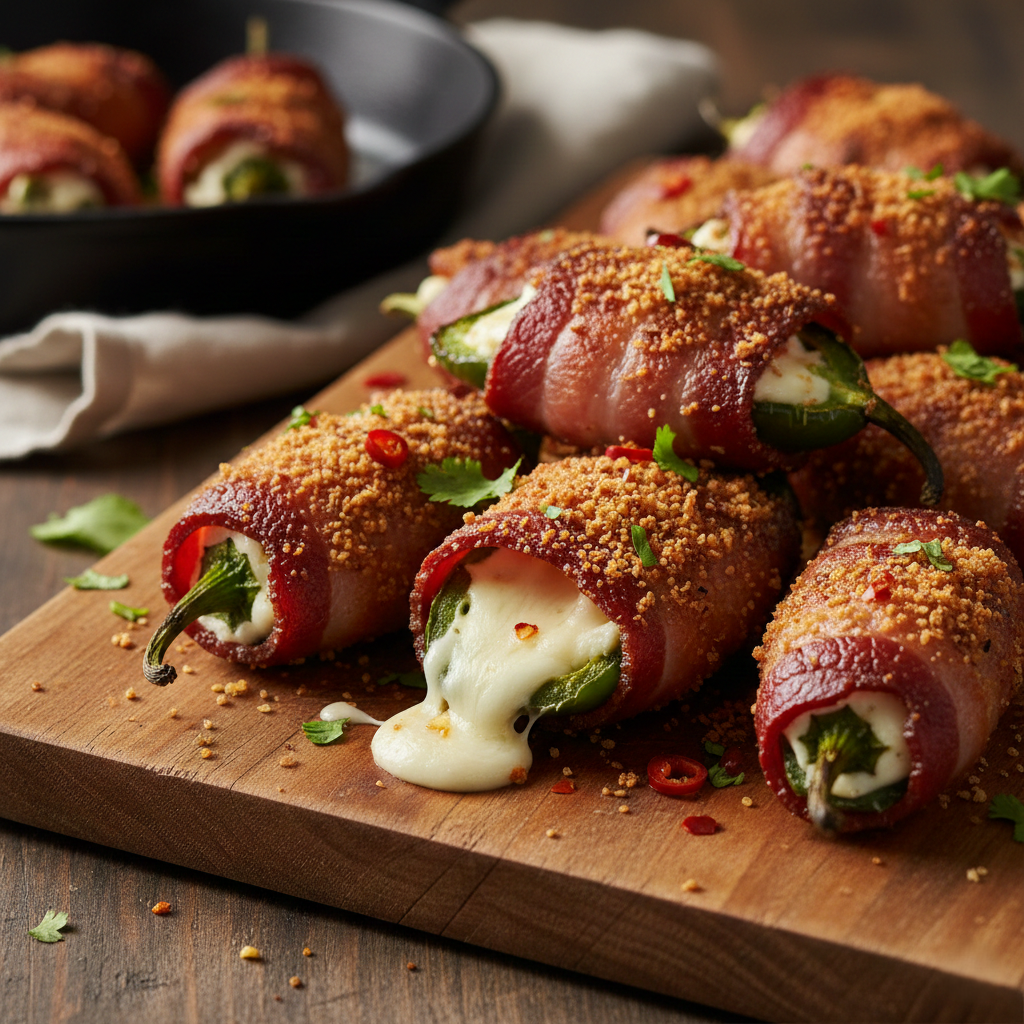
Smoky Bacon Jalapeño Poppers
Ingredients
The Foundation:
- 12 Fresh Jalapeño Peppers: Look for peppers that are 3-4 inches long, firm, and bright green. Note: Fine white lines on the skin (striations) often indicate a hotter pepper.
- 8 oz (225g) Cream Cheese: Full fat, softened to room temperature. Do not use “whipped” tub varieties; you need the brick style for structure.
- 1 ½ cups (170g) Sharp Cheddar Cheese: Freshly grated. Pre-shredded cheese contains anti-caking agents (cellulose) that prevent smooth melting.
- 1 tsp Garlic Powder: For savory depth.
- ½ tsp Onion Powder: A subtle sweetness that balances the heat.
- ¼ tsp Smoked Paprika: To echo the smokiness of the bacon.
The Crunch Factor:
- 8 strips of Bacon: Cooked until very crispy, then crumbled or chopped finely.
- ½ cup (30g) Panko Breadcrumbs: These Japanese-style crumbs are lighter and crispier than standard breadcrumbs.
- 1 tbsp (15g) Unsalted Butter: Melted.
- 1 tbsp Fresh Chives: Finely chopped (for garnish).
Step-by-Step Instructions
Phase 1: Preparation and Safety
- Preheat: Set your oven to 400°F (200°C). Place a rack in the upper third of the oven. Line your baking sheet with parchment paper.
- Armor Up: Put on your disposable gloves. This is critical. Jalapeño oils stick to skin and can cause severe burning if you touch your eyes or face later.
- The Cut: Slice each jalapeño in half lengthwise (from stem to tip). Leave the stem intact on one half if possible—it looks decorative and provides a “handle” for eating.
- The Scoop: Using a small spoon or melon baller, scrape out the white membranes (ribs) and seeds.
- Mild Version: Remove every single seed and all white ribs.
- Spicy Version: Leave a little bit of the yellow-white membrane intact.
- Bacon Prep: If you haven’t already, fry your bacon until it is crispy and dark red. Drain it on paper towels. Once cool, chop it into fine crumbles.
Phase 2: The Filling
- Mix the Cheeses: In a mixing bowl, combine the softened cream cheese, freshly grated cheddar, garlic powder, onion powder, and smoked paprika.
- Incorporate Bacon: Fold half of your crumbled bacon directly into the cheese mixture. This ensures smoky flavor inside the pepper, not just on top.
- Stuffing: Use a spoon to fill each jalapeño half with the cheese mixture. Mound it slightly, but don’t overfill it too much, or it will drip over the sides while baking.
Phase 3: The Topping (The Secret Weapon)
- Make the Crust: In a small bowl, mix the Panko breadcrumbs with the melted butter and the remaining half of the crumbled bacon. Stir until the crumbs look like wet sand.
- Apply Topping: Dip the cheese-filled side of the jalapeño into the panko mixture, or sprinkle it generously over the top, pressing down gently so it adheres to the cream cheese.
Phase 4: The Bake
- Arrangement: Place the peppers cut-side up on the baking sheet. Ensure they are not touching so heat can circulate.
- Bake: Roast for 18 to 22 minutes. You are looking for two things: the peppers should be tender (slightly wrinkled skins) and the topping should be a deep golden brown.
- Cool: Remove from the oven. Let them sit for at least 5-10 minutes. Warning: The cheese is basically culinary lava right now. If you eat them immediately, you will burn your tongue and miss the flavor.
- Garnish: Sprinkle with fresh chives for a pop of color and serve immediately.
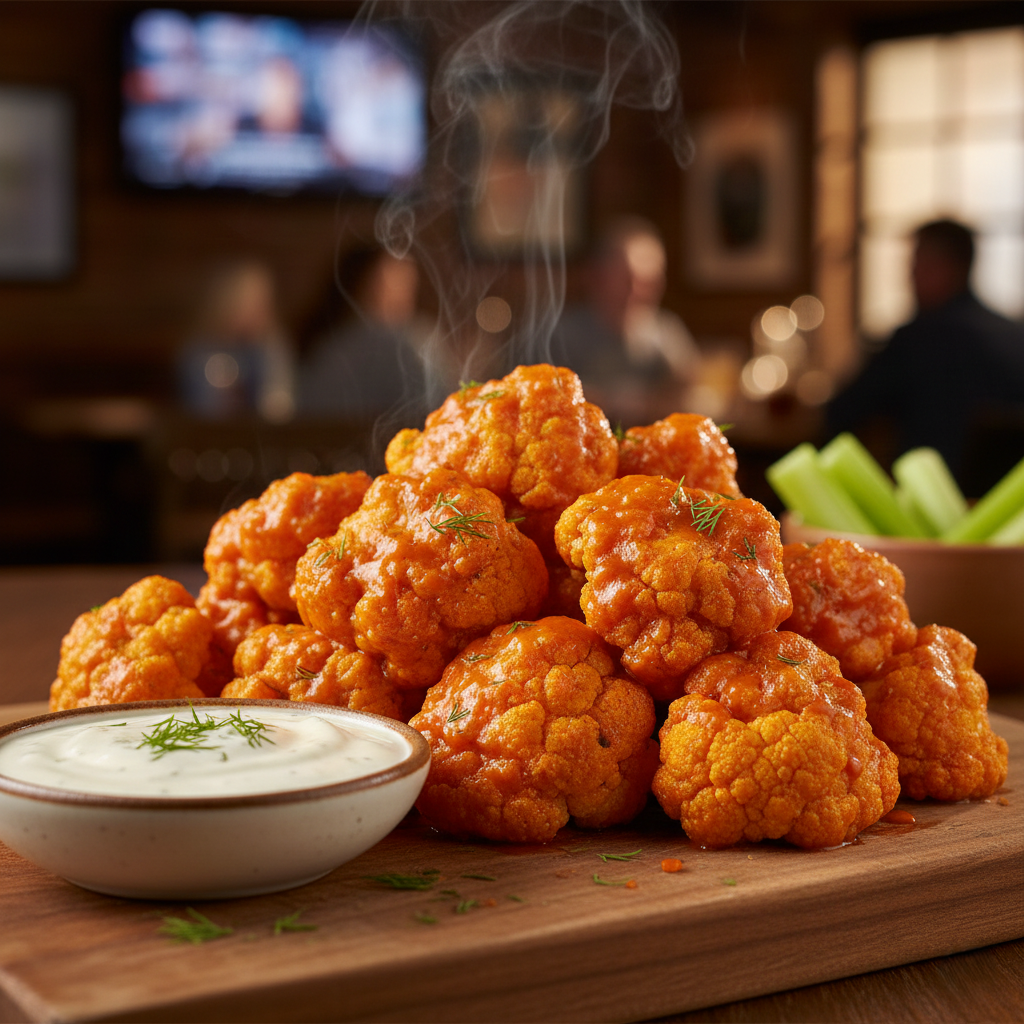
Crispy Buffalo Cauliflower Bites
The Ingredients
The Core:
- 1 Large Head of Cauliflower: Approx. 600-800g. Look for a head that is tight, white, and free of brown spots.
The Batter (The Glue):
- ¾ cup (95g) All-Purpose Flour: (See FAQ for Gluten-Free options).
- 1 cup (240ml) Milk: Dairy or unsweetened Almond/Oat milk works perfectly.
- 1 tsp Garlic Powder: For that savory depth.
- ½ tsp Onion Powder: Aromatic sweetness.
- ½ tsp Paprika: For color and a hint of smoke.
- ½ tsp Salt: To wake up the flavors.
- ¼ tsp Black Pepper.
The Crunch:
- 1 ½ cups (90g) Panko Breadcrumbs.
The Buffalo Sauce:
- ½ cup (120ml) Frank’s RedHot Sauce: Or your preferred cayenne-based hot sauce.
- 2 tbsp (30g) Unsalted Butter: Melted (or vegan butter substitute).
- 1 tsp Honey or Maple Syrup: Optional, but cuts the acidity and helps the sauce glaze the cauliflower.
The Finish:
- Ranch Dressing: For dipping.
- Celery Sticks: The classic palate cleanser.
- Chopped Green Onions: For garnish.
Step-by-Step Instructions
Step 1: Prep the Field
Preheat your oven to 425°F (220°C). This high heat is non-negotiable; it’s what roasts the vegetable rather than steaming it. Line your two baking sheets with parchment paper.
Step 2: Breakdown the Cauliflower
Wash the cauliflower head and—this is critical—dry it thoroughly. Any water left on the veg will make the batter slide off. Cut the cauliflower into bite-sized florets. Try to keep them roughly the same size (about the size of a golf ball) so they cook evenly. Discard the thick main stem (or save it for soup stock!).
Step 3: Mix the Batter
In your medium bowl, whisk together the flour, garlic powder, onion powder, paprika, salt, pepper, and milk. The consistency should be like pancake batter—thick enough to coat a spoon, but thin enough to drip off slowly. If it’s too thick, add a splash more milk.
Step 4: The Dip and Coat (The Assembly Line)
Place your Panko breadcrumbs in a separate bowl.
- Dip a cauliflower floret into the wet batter. Shake off the excess gently.
- Roll the floret in the Panko breadcrumbs until fully coated. Press the crumbs on slightly to help them stick.
- Place on the baking sheet.
Repeat until all florets are coated. Ensure they are not touching on the baking sheet. Crowding leads to soggy cauliflower!
Step 5: The First Bake
Place the trays in the oven and bake for 20-25 minutes. Halfway through, flip the florets over so they brown evenly. They should look golden and feel crispy to the touch when you take them out.
Step 6: The Sauce Toss
While the cauliflower is baking, whisk together the melted butter, hot sauce, and honey in a large bowl.
Remove the crispy cauliflower from the oven. Gently transfer the hot florets into the bowl with the sauce. Toss lightly to coat. You don’t want to drown them; you just want to paint them red.
Step 7: The Final Crisp
Return the sauced cauliflower to the baking sheet. Bake for another 10-15 minutes. This step bakes the sauce into the crust, making it sticky and intensifying the flavor.
Step 8: Serve and Celebrate
Remove from the oven. Transfer to a serving platter. Garnish with chopped green onions. Serve immediately with a side of cool ranch dressing and celery sticks.
Homemade Crab Rangoon Guide

The Ingredients
The Filling:
- 8 oz (225g) Cream Cheese: Crucial: Use the block style, not the whipped tub variety. It must be softened to room temperature for smooth mixing.
- 6 oz (170g) Crab Meat: You have choices here. Fresh lump crab is best for a premium taste. Canned white crab meat is the standard pantry staple (drain it well!). High-quality surimi (imitation crab) works perfectly for that nostalgic takeout flavor—just chop it finely.
- 2 Green Onions (Scallions): Finely sliced, both white and green parts.
- 1 tsp Garlic: Freshly minced or grated paste.
- 1 tsp Worcestershire Sauce: This is the secret weapon. It provides the anchovy-based umami that makes the savory notes pop.
- 1 tsp Soy Sauce: Use regular or light soy sauce.
- ½ tsp Toasted Sesame Oil: A little goes a long way for aroma.
- ½ tsp Sugar: To balance the saltiness of the soy and cheese.
The Wrapper & Fry:
- 1 pack Wonton Wrappers: Look for square wrappers (usually found in the produce aisle near tofu).
- 1 Egg White (beaten) or small bowl of water: For sealing the edges.
- Neutral Oil for frying: Vegetable, Canola, or Peanut oil. You need enough to fill your pot about 2–3 inches deep.
Step-by-Step Instructions
Phase 1: The Creamy Core
- Soften and Beat: Place your room-temperature cream cheese in a mixing bowl. Beat it with a spoon or spatula until it is completely smooth and free of lumps. If it’s cold, the filling will be chunky.
- Flavor Injection: Add the Worcestershire sauce, soy sauce, sesame oil, sugar, minced garlic, and sliced green onions. Mix until the color is uniform.
- The Crab Fold: Gently fold in the crab meat. Chef’s Note: If using lump crab, try not to break the chunks apart too much. If using imitation crab, ensure it is chopped to the size of a pea so it mixes evenly.
- Taste Test: Take a tiny smudge on your finger. Does it need more salt? (Add a splash more soy). More zip? (Add a pinch of white pepper).
Phase 2: The Art of the Fold
This is where patience pays off. Set up a workstation with your stack of wrappers, a small bowl of water (or egg white), your filling, and a baking sheet to place the finished raw rangoons.
- The Dollop: Place a wrapper flat on your hand or cutting board. Place exactly one teaspoon of filling in the center. Do not overfill, or they will explode in the oil.
- The Wet Seal: Dip your finger in the water/egg white and run it along all four edges of the square wrapper.
- The “Four-Point Star” (Classic Shape):
- Bring two opposite corners up to meet in the middle above the filling. Pinch them together.
- Bring the remaining two corners up to the center.
- Pinch all four seams tightly together, pushing out any air bubbles as you go. You should have an ‘X’ shape at the top.
- The “Triangle” (Easy Shape):
- Fold the wrapper in half diagonally to create a triangle.
- Press the edges firmly to seal, ensuring no air is trapped near the filling.
- Rest: Place the folded rangoon on the baking sheet. Repeat until filling is used. Cover them with a slightly damp towel to keep the dough from drying out while you finish.
Phase 3: The Golden Fry
- Heat the Oil: Pour oil into your Dutch oven or wok. Attach your thermometer. Heat the oil to 350°F (175°C).
- Why this temp? Too low, and the wrapper absorbs oil and gets greasy. Too high, and the outside burns before the inside warms through.
- The Drop: Carefully lower 4–5 rangoons into the oil. Do not crowd the pan! Crowding drops the oil temperature too fast.
- The Sizzle: Fry for 2 to 3 minutes. Flip them gently with your spider strainer to ensure even browning.
- The Retrieval: Once they are a deep golden brown, remove them from the oil.
- The Drain: Transfer immediately to a wire rack set over a baking sheet or paper towels.
- Pro Tip: Never put fried food directly on a flat plate or paper towel pile; the steam underneath will make the bottom soggy. Airflow is key to the crunch!
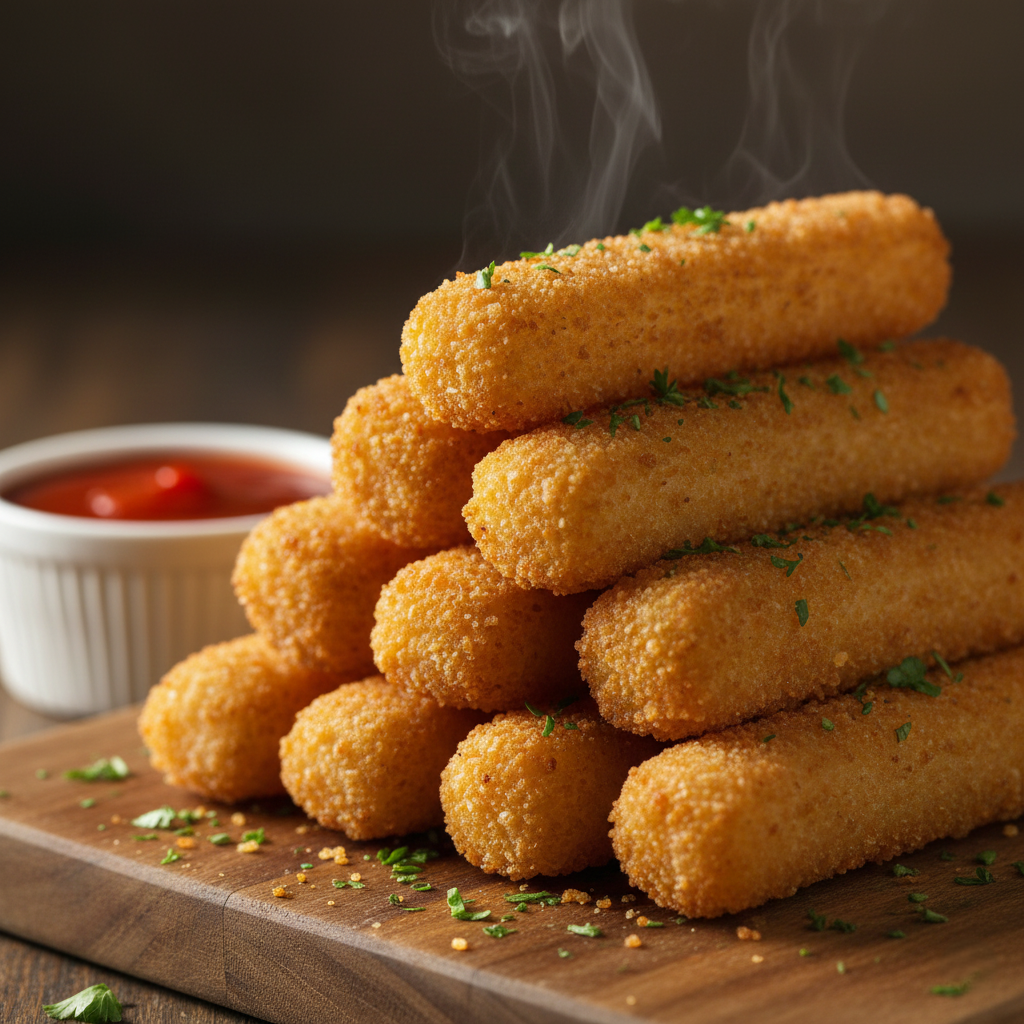
Crispy Air Fryer Mozzarella Sticks
Ingredients Checklist
The Core:
- 12 Sticks Mozzarella String Cheese (Part-skim, low-moisture is best).
- 2 Large Eggs.
- ½ cup (65g) All-Purpose Flour.
- 1 ½ cups (150g) Italian Seasoned Breadcrumbs (or a mix of Panko and standard crumbs).
- ¼ cup (25g) Grated Parmesan Cheese.
The Flavor Boosters:
- 1 tsp Garlic Powder.
- ½ tsp Dried Oregano or Parsley.
- ½ tsp Salt & ¼ tsp Black Pepper.
The Essentials:
- Cooking Spray (Olive oil or Canola oil spray).
- 1 cup Marinara Sauce (warmed, for dipping).
Step-by-Step Instructions
Phase 1: The Setup
- Prep the Cheese: Unwrap your mozzarella sticks.
- Create the Stations: Line up your three shallow bowls.
- Bowl 1 (Dry): Whisk together the flour and salt.
- Bowl 2 (Wet): Crack the eggs and whisk them vigorously with a tablespoon of water until smooth.
- Bowl 3 (Crunch): Combine the Italian breadcrumbs, parmesan cheese, garlic powder, dried herbs, and black pepper.
Phase 2: The Double Dip (Crucial Step!)
- The First Coat: Roll a cheese stick in the flour. Dip it into the egg wash, ensuring it is fully coated. Finally, press it into the breadcrumbs.
- The Reinforcement: Stop! Do not put it down yet. We need a thick armor to keep the cheese in. Dip the breaded stick back into the egg, and then back into the breadcrumbs. Press the crumbs on firmly.
- Repeat: Place the double-coated stick on a parchment-lined baking sheet. Repeat for all 12 sticks.
Phase 3: The Big Freeze
- Patience is Key: Place the baking sheet with your breaded sticks into the freezer. Freeze them for at least 60 minutes. If you skip this, the cheese will melt before the crust forms!
Phase 4: Air Frying
- Preheat: Preheat your air fryer to 390°F (200°C).
- Arrange & Spray: Place the frozen sticks in the basket in a single layer (do not stack!). Generously spray the sticks with cooking oil spray. This helps the breadcrumbs turn golden brown.
- Cook: Air fry for 6 to 8 minutes. Flip carefully halfway through and spray again. Watch them closely in the last 2 minutes for any cheese leaks!
Phase 5: The Cool Down
- Rest: Remove carefully and let sit for 2 minutes to let the cheese firm up slightly.
- Serve: Sprinkle with parmesan and serve with warm marinara.
Coconut Shrimp with Sweet Heat Apricot Glaze
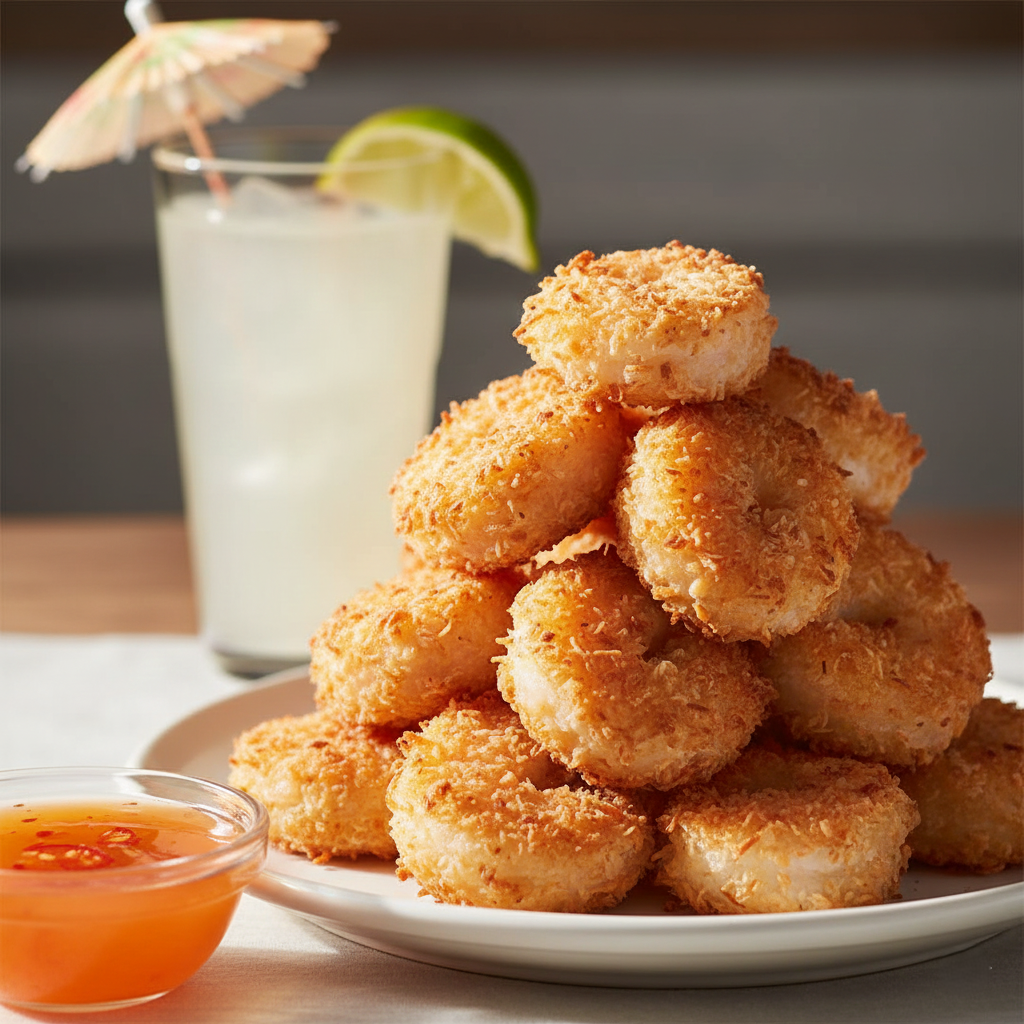
The Ingredients
For the Shrimp:
- 1 lb (450g) Large or Jumbo Shrimp: Peel and deveined, but leave the tails on (this provides a handle for dipping).
- 1 cup (125g) All-Purpose Flour: This creates the dry base.
- 1 tsp Garlic Powder: For a savory undertone.
- 1/2 tsp Salt: Plus more for finishing.
- 1/2 tsp Black Pepper: Freshly cracked is best.
- 2 Large Eggs: Whisked until frothy.
- 1 cup (75g) Panko Breadcrumbs: Japanese-style crumbs are essential for the crunch.
- 1 cup (85g) Sweetened Shredded Coconut: Gives that classic tropical flavor and chewy texture.
- Vegetable or Canola Oil: For frying (high smoke point oils are best).
For the Spicy Apricot Dip:
- 1/2 cup (150g) Apricot Preserves: Or orange marmalade if you prefer citrus notes.
- 1 tbsp Rice Vinegar or Apple Cider Vinegar: To cut through the sweetness.
- 1 tsp Crushed Red Pepper Flakes: Adjust based on your heat tolerance.
- 1 pinch Salt: To bring the flavors together.
Step-by-Step Instructions
Phase 1: The Setup
1. Prepare the Sauce:
Before you get your hands sticky, make the sauce. In a small bowl, whisk together the apricot preserves, vinegar, crushed red pepper flakes, and a pinch of salt. If the preserves are very chunky, you can microwave them for 15 seconds to loosen them up. Set this aside to let the flavors meld.
2. Butterfly the Shrimp (Optional but Recommended):
Take a sharp paring knife and run it along the back curve of the shrimp (where the vein was). Cut slightly deeper than usual, but not all the way through. Press the shrimp flat. This increases the surface area, meaning more crunchy coconut coating per bite!
3. The Dredging Station:
Set up your assembly line from left to right:
- Bowl 1: Mix the flour, garlic powder, salt, and pepper.
- Bowl 2: The whisked eggs.
- Bowl 3: Mix the Panko breadcrumbs and shredded coconut together. Use your fingers to toss them until well combined.
Phase 2: The Coat
4. The Wet hand/Dry Hand Method:
Grab a shrimp by the tail.
- Dip into Bowl 1 (Flour): Shake off all excess. You want a thin veil of white dust, not a clump.
- Dip into Bowl 2 (Egg): Submerge fully, then let the excess drip off for a second.
- Dip into Bowl 3 (Coconut Mix): Lay the shrimp in the mix. Heap the coconut over the top and press down firmly with your open palm. This pressure is the secret to the coating sticking.
5. Rest:
Place the coated shrimp on a baking sheet. Repeat until all shrimp are coated. Chef’s Note: Let them sit for 5–10 minutes before frying. This allows the gluten in the flour and the proteins in the egg to bond, preventing the crust from falling off in the oil.
Phase 3: The Fry
6. Heat the Oil:
Pour about 2 inches of oil into your pot. Attach your thermometer. Bring the heat to 350°F (175°C). If you don’t have a thermometer, stick the handle of a wooden spoon in the oil; if tiny bubbles immediately fizz around it, you are ready.
7. Fry in Batches:
Carefully lower 4–5 shrimp into the oil. Do not overcrowd the pot! If you add too many, the oil temperature drops, and the shrimp will become greasy.
8. Watch the Color:
Fry for about 2 to 3 minutes. You are looking for a deep golden-brown color. Because the shrimp cooks fast, once the coconut is golden, the seafood inside is done.
9. Drain and Cool:
Remove with a slotted spoon or spider strainer. Place them immediately on a wire rack positioned over a paper towel.