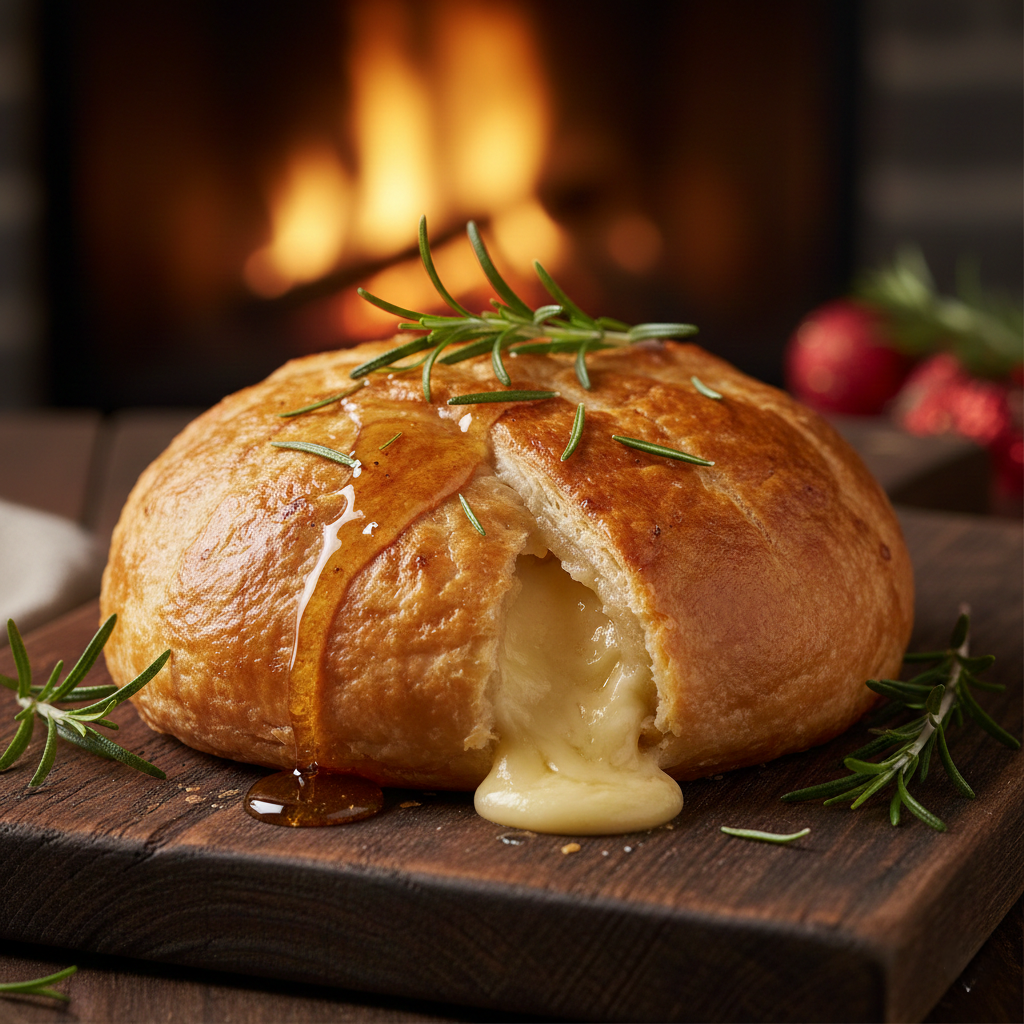
Baked Brie en Croûte with Cranberry and Pecan
Ingredients
To create this masterpiece, you need quality ingredients. Since there are so few components, make sure each one counts.
The Core:
- Brie Wheel: 1 wheel (approx. 8 oz / 225g-250g). Tip: Do not buy a wedge; you need the full wheel with the rind intact to hold the cheese as it melts.
- Puff Pastry: 1 sheet, thawed but still cold. (Store-bought frozen puff pastry is perfectly acceptable and recommended).
The Flavor Profile:
- Cranberry Sauce: 1/3 cup (80ml). Whole berry sauce is preferred over jelly for texture.
- Pecans: 1/4 cup (30g), roughly chopped.
- Honey: 1 tablespoon, for drizzling.
- Fresh Rosemary: 1 sprig (leaves stripped and minced), plus extra sprigs for garnish.
The Finish:
- Egg Wash: 1 large egg beaten with 1 tablespoon of water.
- Sea Salt: A pinch for the top.
Step-by-Step Instructions
Step 1: Prepare Your Canvas
Preheat your oven to 400°F (200°C). This high heat is crucial because it creates the steam needed to puff the pastry layers before the butter melts out. Line your baking sheet with parchment paper.
Step 2: The Nutty Crunch
While the oven heats, place your chopped pecans in a dry pan over medium heat for 2-3 minutes. Shake the pan frequently. You want them to smell fragrant and look slightly darker. Toasting releases the oils in the nuts, making them crunchier and more flavorful. Set them aside to cool.
Step 3: Roll the Dough
Lightly flour your clean kitchen counter or a cutting board. Unfold your thawed puff pastry. Using your rolling pin, gently roll it out just enough to smooth the creases. You don’t want it paper-thin; you want a sturdy vessel for the cheese. Aim for a square roughly 10-12 inches wide.
Step 4: Layering the Flavors
Place the wheel of Brie in the direct center of the pastry.
- Note on the Rind: Do not remove the rind. The white rind is edible, mild, and acts as the structural wall that keeps the melted cheese from flowing out too early.
- Spread the cranberry sauce generously over the top of the brie wheel.
- Sprinkle the toasted pecans over the sauce.
- Drizzle with the honey.
- Scatter the minced fresh rosemary over everything.
Step 5: The Bundle Technique
This is the artistic part. You need to wrap the cheese completely.
- Take one corner of the pastry and fold it over the center of the cheese.
- Take the next corner and fold it over, overlapping the first.
- Continue working your way around, pleating the dough as necessary. It should look like a rustic parcel.
- Gently squeeze the dough together at the top center to seal it. Ensure there are no gaps where cheese could leak out.
Optional Decorative Touch: If you have excess dough that you trimmed off, use cookie cutters to make leaves or stars and stick them onto the bundle using a drop of water.
Step 6: The Golden Gloss
Move the wrapped brie onto your parchment-lined baking sheet. Using your pastry brush, coat the entire surface of the dough with the egg wash. This step is non-negotiable! It acts as a glue for the pleats and creates that appetizing, deep golden-brown color. Without it, your pastry will look pale and dry.
Step 7: The Bake
Place the baking sheet in the center rack of the oven. Bake for 20 to 25 minutes.
- What to watch for: The pastry should be puffed and deeply golden brown. You might see a tiny bubble of cheese escaping—that is okay; it adds to the charm. If it browns too quickly (before 20 minutes), tent a piece of foil loosely over the top.
Step 8: The Hardest Part—The Rest
Remove the brie from the oven. Let it rest for at least 5 to 10 minutes.
- Why? If you cut into it immediately, the cheese will be liquid like soup and will flood the plate, leaving you with an empty crust. Resting allows the cheese to firm up slightly to a perfect, oozy consistency.
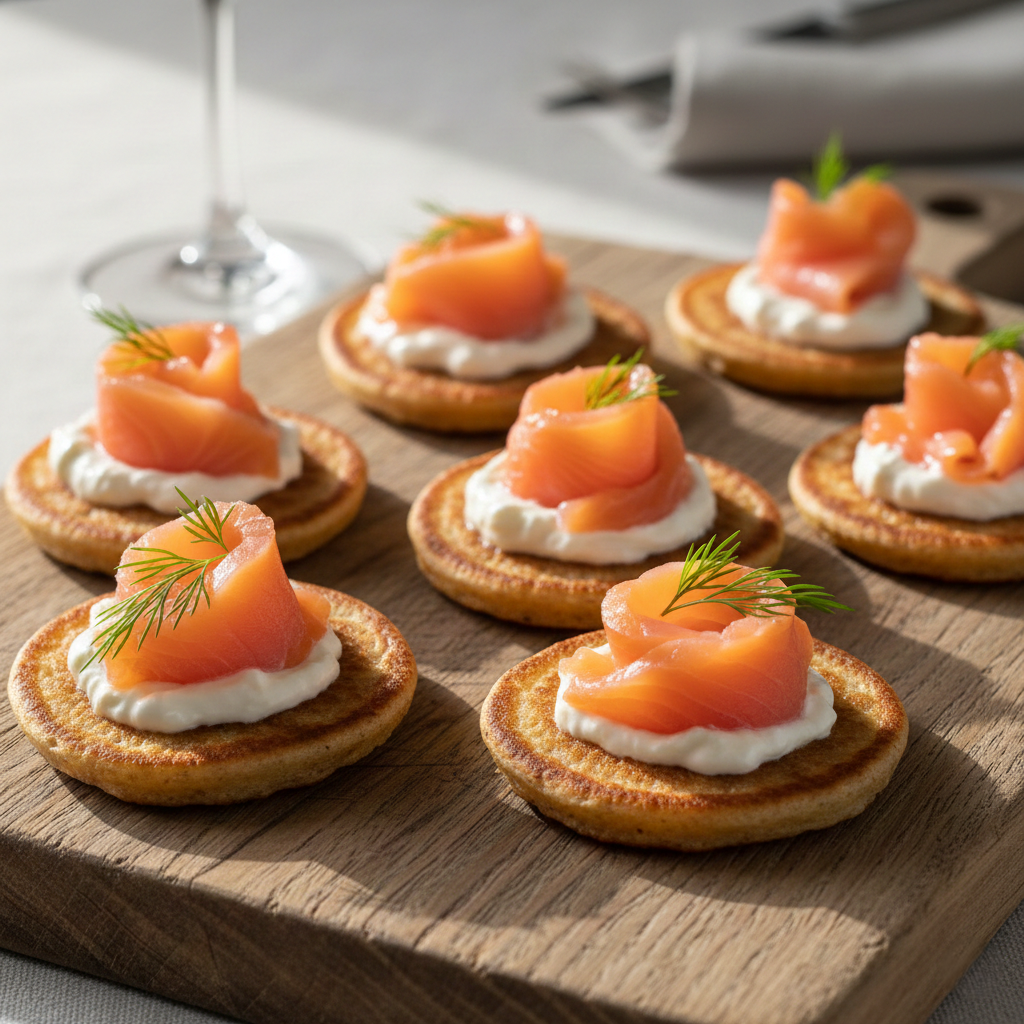
Smoked Salmon Blinis with Crème Fraîche
Ingredients
For the Buckwheat Blini Batter:
- Buckwheat Flour: ½ cup (65g)
- All-Purpose Flour: ½ cup (65g)
- Dry Active Yeast: 1 teaspoon (or ½ tsp baking powder if you are in a rush, but yeast tastes better!)
- Milk: ¾ cup (180ml), warmed slightly
- Egg: 1 large, separated (yolk and white separated)
- Butter: 2 tablespoons (30g), melted and cooled
- Salt: ½ teaspoon
- Sugar: ½ teaspoon (to feed the yeast)
- Vegetable Oil or Clarified Butter: For frying
For the Topping:
- Smoked Salmon: 200g (7 oz), thinly sliced (choose cold-smoked for a silky texture)
- Crème Fraîche: ½ cup (120ml)
- Fresh Dill: 1 small bunch, small sprigs picked
- Lemon: 1, for zest and juice
- Capers: 2 tablespoons, drained
- Black Pepper: Freshly cracked
Step-by-Step Instructions
Phase 1: The Batter
- Activate the Yeast: In a large bowl, combine the warm milk and sugar. Sprinkle the yeast over the top and let it sit for 5 minutes until it becomes frothy and bubbly. This tells you the yeast is alive!
- Mix the Flours: In a separate bowl, whisk together the buckwheat flour, all-purpose flour, and salt.
- Combine Wet and Dry: Add the melted butter and the egg yolk (save the white for later!) to the yeasty milk. Whisk to combine. Gradually whisk in the flour mixture until you have a smooth batter. It should be the consistency of heavy cream.
- The First Rest: Cover the bowl with a clean kitchen towel and let it rest in a warm place for about 45 minutes to 1 hour. The batter will rise and become bubbly.
- The Fluff Factor: Just before you are ready to cook, beat the egg white in a clean bowl until stiff peaks form (like a cloud). Gently fold this into the risen batter. This is the secret to light-as-air blinis.
Phase 2: Cooking
- Heat the Pan: Place your non-stick skillet over medium heat. Brush lightly with oil or butter.
- Pour: Drop tablespoons of batter into the pan. Leave space between them so you can flip easily. You want them to be about 2 inches (5cm) in diameter.
- Watch for Bubbles: Cook for about 1–2 minutes. Look for tiny bubbles popping on the surface of the batter. When the bubbles pop and stay open, flip them over.
- Finish: Cook the other side for 45 seconds until golden brown. Transfer to a wire rack to cool slightly.
Phase 3: The Assembly
- The Cream Base: Place a dollop (about a teaspoon) of crème fraîche on top of each warm (or room temp) blini.
- The Salmon: Take a strip of smoked salmon and twist it slightly to give it height. Place it gently on the cream.
- The Garnish: Sprinkle a few capers over the salmon. Top with a tiny sprig of fresh dill.
- The Finale: Grate fresh lemon zest over the entire platter and finish with a crack of black pepper.
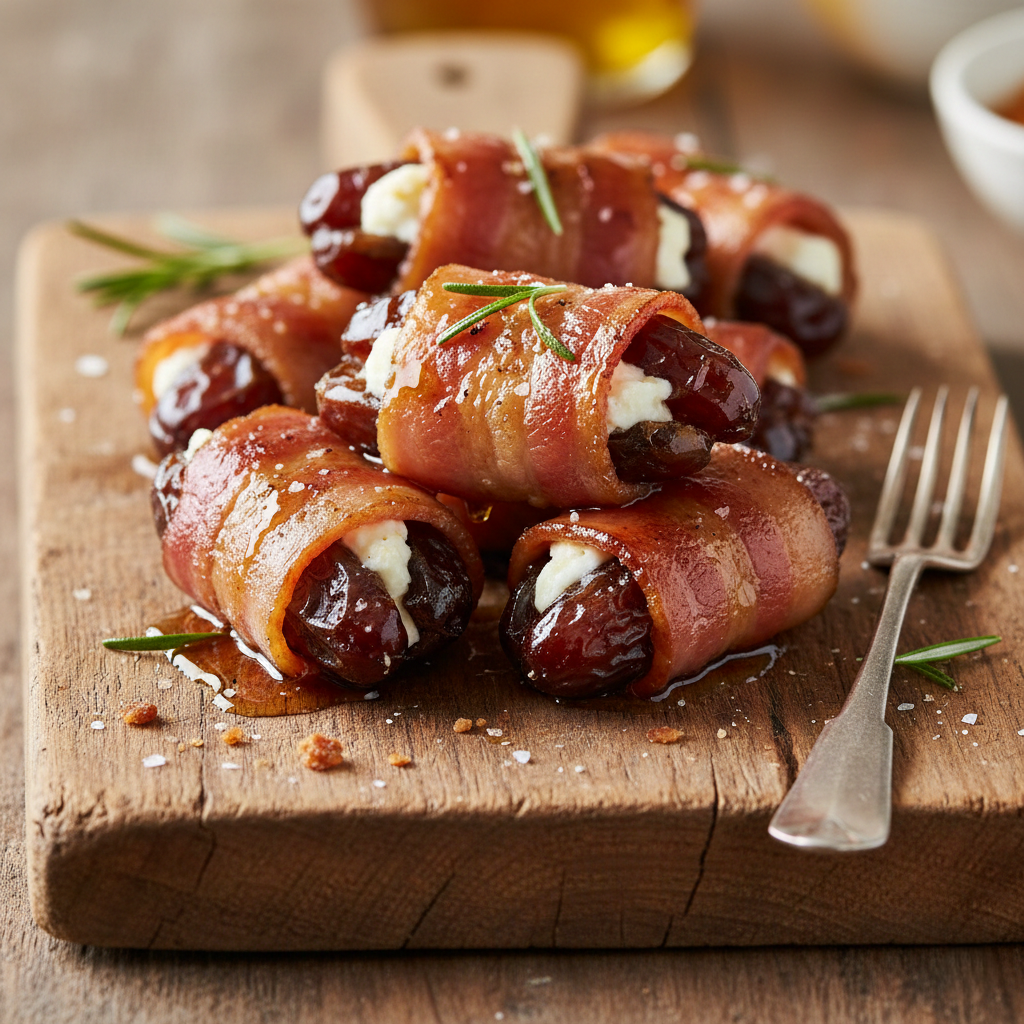
Bacon-Wrapped Dates
Ingredients
The Core Trio:
- 12-15 Large Medjool Dates: Ensure they are soft and sticky. If they are dry, the texture won’t be right.
- 6-8 Slices of Bacon: Use standard cut bacon, not thick-cut. Thick-cut bacon takes too long to crisp up and will leave the date mushy. Cut the slices in half crosswise.
- 115g (4 oz) Goat Cheese (Chèvre): Soft, spreadable plain goat cheese is best.
The Flavor Boosters:
- 2 Tablespoons Maple Syrup: Use real maple syrup for the complexity needed for the glaze.
- Freshly Cracked Black Pepper: To cut the sweetness.
- Optional: A pinch of cayenne pepper if you want to honor the “Devil” origins.
Step-by-Step Instructions
- Prep the Oven and Tools: Preheat your oven to 200°C (400°F). Line your baking sheet with foil or parchment paper to catch the drips. Place the wire rack on top of the lined baking sheet. Chef’s Trick: Soak your wooden toothpicks in water for 10 minutes to prevent burning.
- Pit the Dates: If not already pitted, use a paring knife to make a lengthwise slit. Remove the pit to create a “pocket.” Keep the back hinge intact.
- Stuff with Cheese: Take about a teaspoon of goat cheese and gently stuff it into the date. Caution: Do not overstuff.
- The Bacon Wrap: Wrap a half-slice of bacon snugly around the stuffed date. Secure the loose end by spearing a toothpick through the bacon and the date.
- Bake (The First Pass): Arrange on the wire rack (not touching). Bake for 15 to 18 minutes. The bacon should be browning but not fully crisp.
- The Maple Glaze: Remove from oven. Brush generous amounts of maple syrup over each date. Grind fresh black pepper over the top.
- The Final Crisp: Return to oven for 3 to 5 minutes. Watch closely for a deep mahogany color and sizzling glaze.
- Rest and Serve: Let them rest on the rack for 5–7 minutes so the cheese sets and you don’t burn your tongue!
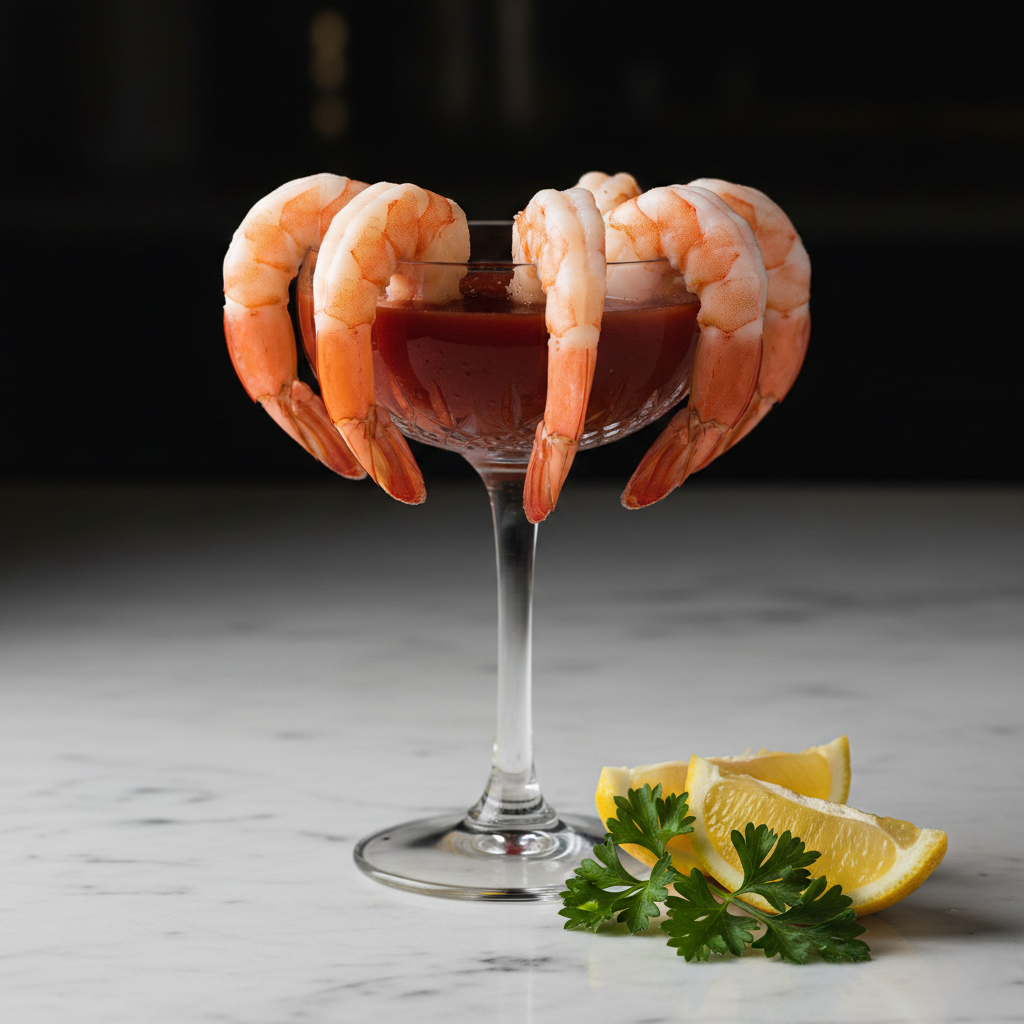
Classic Shrimp Cocktail
Ingredients
The Shrimp & Poaching Liquid (Court Bouillon):
- 2 lbs (900g) Jumbo Shrimp: Raw, shell-on, and deveined. Look for “16-20 count” (this means 16 to 20 shrimp per pound).
- 1 large Lemon: Quartered.
- 2 stalks Celery: Roughly chopped (leaves included).
- ½ White Onion: Roughly chopped.
- 1 tbsp Black Peppercorns: Whole.
- 2 Bay Leaves: Dried or fresh.
- 1 tsp Kosher Salt: Crucial for seasoning.
- Ice: A lot of it (for the ice bath).
The Zesty Horseradish Sauce:
- 1 cup Ketchup: Use a high-quality brand with simple ingredients.
- 2-3 tbsp Prepared Horseradish: Crucial Note: Do not buy “horseradish sauce” (which is creamy). Buy “prepared horseradish” (grated root in vinegar).
- 1 tsp Worcestershire Sauce: For deep umami flavor.
- 1 tsp Hot Sauce: Tabasco or Crystal works best.
- 1 tbsp Fresh Lemon Juice: Plus wedges for serving.
- ¼ tsp Celery Salt: The secret ingredient for that classic savory finish.
Step-by-Step Instructions
Phase 1: The Aromatic Poach
1. Build the Bath:
Fill your large stockpot with about 3 quarts of water. Squeeze the juice from the quartered lemons into the water, then toss in the rinds. Add the chopped celery, onion, peppercorns, bay leaves, and salt.
2. Infuse the Water:
Bring the pot to a rolling boil over high heat. Once boiling, reduce the heat slightly and let it simmer for 10 minutes. Why? We need the vegetables to release their flavor into the water before the shrimp goes in.
3. The Gentle Swim:
Remove the pot from the heat completely. Yes, you read that right. Take it off the heat. Stir in the raw shrimp. The residual heat of the water is enough to cook them gently. Cover the pot with a lid.
4. Timing is Everything:
Let the shrimp sit in the hot liquid for 3 to 5 minutes. Watch them closely. They are done when they curl into a “C” shape and turn an opaque pink.
Phase 2: The Thermal Shock
5. The Ice Bath:
While the shrimp are poaching, fill your large mixing bowl with ice and cold water.
6. Stop the Cooking:
As soon as the shrimp are pink and firm, use a slotted spoon to transfer them immediately into the ice bath. This “shocks” the protein, stopping the cooking process instantly. This is the secret to that signature “snap” when you bite into them.
7. Peel and Clean:
Once the shrimp are completely cold (about 5 minutes), drain them. Peel the shells off, leaving the tails on for a convenient handle. Pat them very dry with paper towels.
Phase 3: The Sauce & Service
8. Mix the Dip:
In a small bowl, combine the ketchup, prepared horseradish, Worcestershire sauce, hot sauce, lemon juice, and celery salt. Whisk until smooth. Taste it! Does it need more kick? Add more horseradish.
9. Chill:
Refrigerate both the sauce and the shrimp for at least 30 minutes before serving.
10. Assembly:
Serve the shrimp arranged on a bed of crushed ice or hung over the rim of a martini or coupe glass. Place the sauce in the center. Garnish with lemon wedges and leafy celery tops.
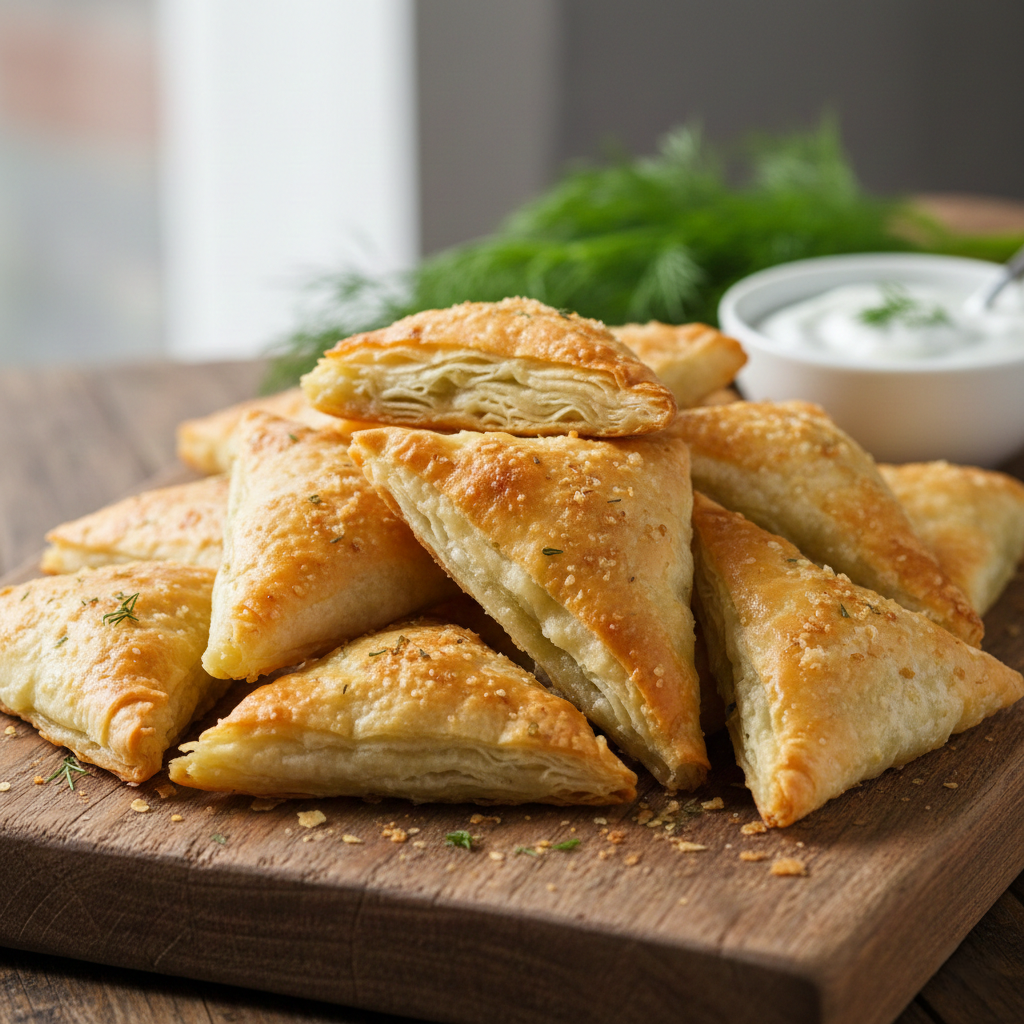
Spanakopita Triangles
Ingredients
The Crispy Exterior:
- Phyllo Dough: 1 pound (450g) box, thawed overnight in the fridge. (Do not try to speed-thaw this!)
- Unsalted Butter: 1 cup (2 sticks / 225g), melted and cooled slightly.
The Savory Filling:
- Frozen Chopped Spinach: 10 oz (280g). See Chef’s Tips regarding preparation.
- Feta Cheese: 8 oz (225g), crumbled. Try to buy a block in brine and crumble it yourself for better texture.
- Ricotta Cheese: ½ cup (120g). This adds a velvety texture that binds the feta.
- Yellow Onion: 1 small, finely chopped.
- Green Onions (Scallions): 3 stalks, thinly sliced (white and light green parts).
- Fresh Dill: ¼ cup (10g), chopped. Dried dill does not compare here—go fresh!
- Fresh Parsley: 2 tablespoons, chopped.
- Eggs: 2 large, lightly beaten.
- Olive Oil: 1 tablespoon (for sautéing).
- Lemon Zest: 1 teaspoon (optional, but brightens the flavor).
- Black Pepper: To taste. (Go easy on the salt, as feta is very salty).
Step-by-Step Instructions
Phase 1: The Filling Preparation
- The Great Squeeze: This is the most critical step. Thaw your frozen spinach completely. Place it in a clean kitchen towel or cheesecloth and twist. Squeeze out every single drop of liquid you can. If you think you are done, squeeze again. Wet spinach equals soggy pastry. You want the spinach to be dry and fluffy.
- Sauté Aromatics: Heat 1 tablespoon of olive oil in a skillet over medium heat. Add the chopped yellow onion and green onions. Sauté for about 5–8 minutes until they are soft and translucent, but not browned. Add the spinach to the pan and cook for another 2 minutes to evaporate any residual moisture. Remove from heat and let it cool completely.
- Mix the Filling: In a large bowl, combine the crumbled feta, ricotta, cooled spinach mixture, fresh dill, parsley, and lemon zest. Stir in the beaten eggs and black pepper.
Phase 2: The Phyllo Setup
- Prepare the Station: Clear a large workspace. Unroll your phyllo dough. Immediately cover the stack with a sheet of plastic wrap, and place a slightly damp (not wet!) towel on top of the plastic. This prevents the dough from drying out and becoming brittle.
- Cut the Strips: Using a sharp knife, cut the stack of phyllo lengthwise into strips about 3 inches (7.5 cm) wide. You should get 3 or 4 long strips depending on the dimensions of your dough sheets.
Phase 3: The Fold (The Flag Method)
- Layering: Take one single strip of phyllo. Brush it lightly with melted butter. Place a second strip directly on top of the first. Brush that with butter as well.
- Filling: Place a generous tablespoon of the spinach filling at the bottom corner of the strip.
- Folding: Fold the bottom corner (with the filling) up diagonally to meet the opposite edge, forming a triangle. Fold that triangle straight up. Fold it diagonally again. Continue this “flag-folding” pattern until you reach the top of the strip.
- Seal & Repeat: Brush the final outer layer with butter to seal. Place seam-side down on your baking sheet. Repeat until all filling is used.
Phase 4: The Bake
- Preheat: Preheat your oven to 375°F (190°C).
- Final Brush: Give the tops one final, generous brush of melted butter.
- Bake: Bake for 20–25 minutes. You are looking for a deep golden color, not pale yellow. The darker the golden hue, the crispier the crunch.
- Cool: Let them sit on the tray for 5 minutes before serving.
