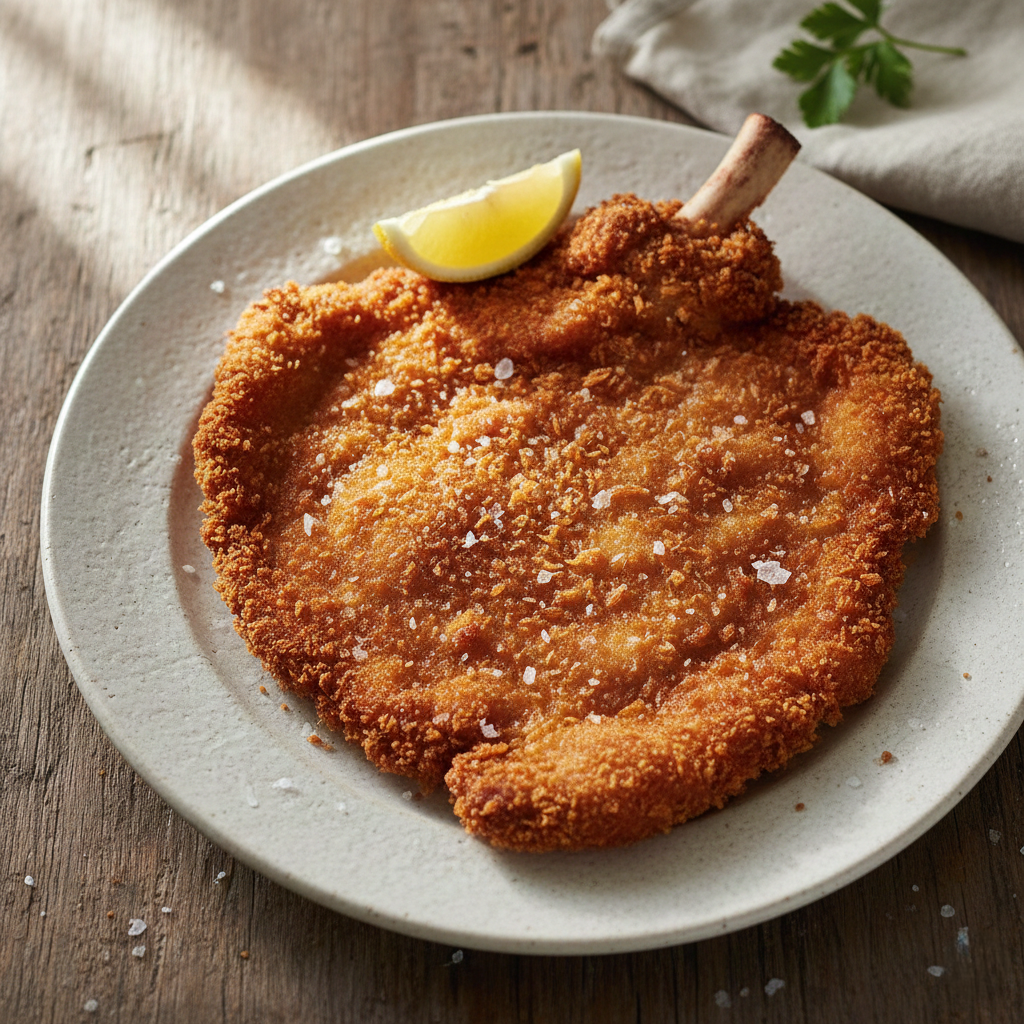
The Golden Crown of Milan: Authentic Cotoletta alla Milanese
A close-up of the finished dish, ready to be served.
There are few sounds in the culinary world more satisfying than the rhythmic sizzle of a thick cutlet gently frying in a pool of golden, clarified butter. The aroma is distinct—nutty, rich, and unmistakably comforting. This is not just a breaded cutlet; this is the Cotoletta alla Milanese.
Often mistaken for its thinner Austrian cousin, the Wiener Schnitzel, the true Milanese chop is a beast of its own. It is proud, substantial, and incredibly juicy.
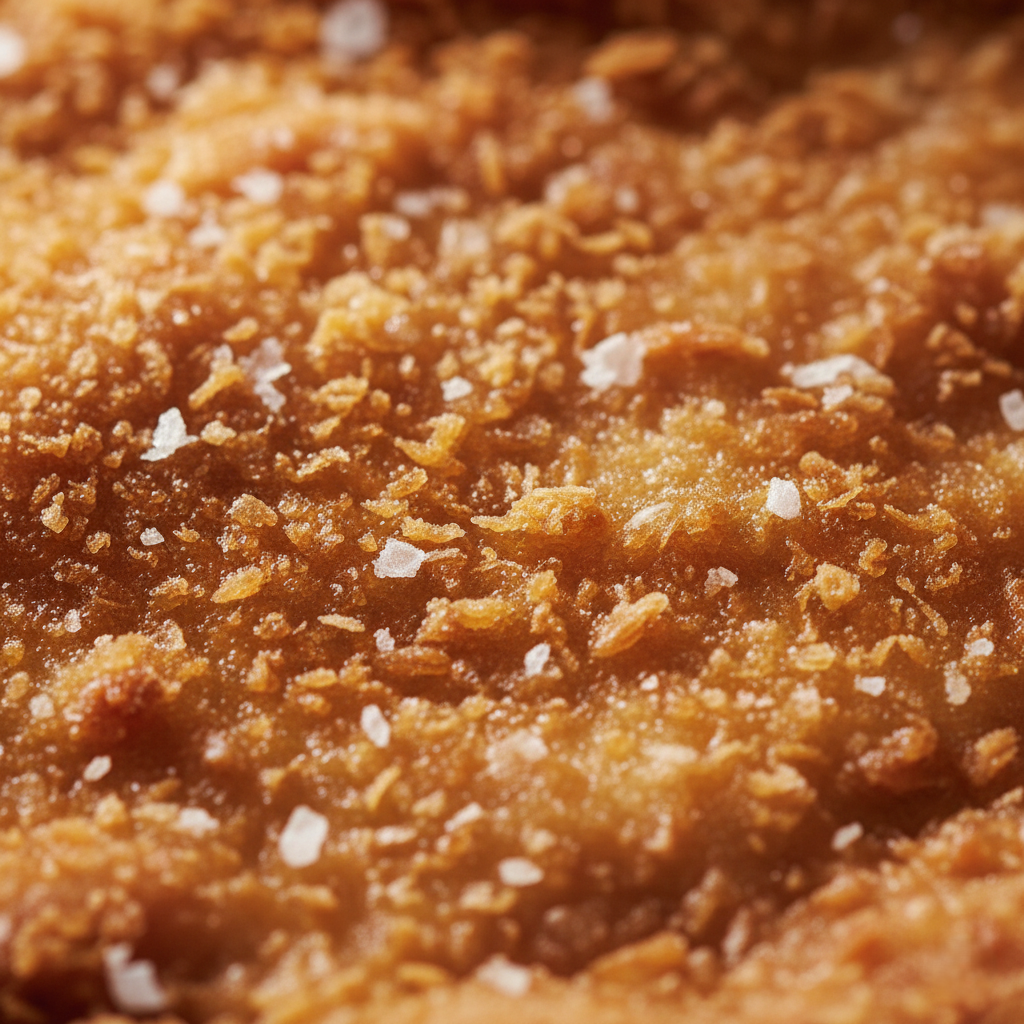
Imagine sinking your teeth into a crispy, amber-colored crust that shatters audibly, only to reveal tender, rose-pink veal that practically melts on your tongue. Finished with a sharp squeeze of fresh lemon to cut through the richness, it is a masterpiece of Italian engineering on a plate.
Today, we are going to transport your kitchen to the foggy, fashion-forward streets of Milan. We are going to master the art of the perfect chop.
Why You Need This Dish in Your Repertoire
Why should you spend your evening standing over a hot skillet? Because the Cotoletta alla Milanese is the ultimate “high-reward” meal. It looks incredibly impressive—like something served at a Michelin-starred restaurant—yet the process is surprisingly grounded.
This dish is the definition of indulgence. It is unapologetically rich, cooked in butter rather than oil, honoring a tradition that refuses to cut corners. Whether you are looking to impress a date, treat your family to a Sunday feast, or simply satisfy a craving for high-quality protein, this recipe delivers. It transforms humble ingredients like breadcrumbs and eggs into a luxurious experience. If you love texture—the contrast between crunchy exterior and soft interior—this is your holy grail.
Mastering the Art of Clarified Butter
Beyond the delicious taste, learning to make this dish offers immense culinary value. You aren’t just following a recipe; you are learning the science of frying.
The secret weapon here is clarified butter (often called ghee in other cuisines). Regular butter burns at low temperatures because it contains milk solids. By clarifying the butter—removing those solids—you are left with pure butterfat. This allows you to fry at high heat to get that crucial crunch without the butter turning bitter or black.
Nutritional Snapshot:
- High Protein: Veal is nutrient-dense, packed with essential amino acids needed for muscle repair.
- Energy: The clarified butter provides high-quality fats that satiate hunger quickly.
- Mental Satisfaction: Never underestimate the mental health benefits of a truly satisfying, comfort-food meal shared with loved ones.
A Tale of Two Cities

To eat Cotoletta alla Milanese is to consume history. There is a long-standing friendly rivalry between Milan, Italy, and Vienna, Austria, regarding who invented the breaded cutlet first. Did the Austrians steal the idea from the Italians during their occupation of Northern Italy? Or did the Italians borrow it from the Viennese?
Milanese historians point to documents from the year 1134, listing Lombolos cum panitio (chops with bread) as a course served by monks at the Basilica of Sant’Ambrogio. This predates the Austrian claim by centuries!
Unlike the Wiener Schnitzel, which is pounded paper-thin and boneless, the traditional Cotoletta alla Milanese keeps the bone in. In Milan, you might find two versions:
- Orecchia di Elefante (Elephant’s Ear): Thin and huge, similar to the Austrian style.
- Cotoletta Alta (High Cutlet): The version we are making today. Thick, bone-in, pink in the middle, and cooked with precision.
This dish connects you to the warmth of Italian family dinners, where food is love, and “diet” is a word saved for tomorrow.
The Recipe
Now, let’s get to work. Success lies in the quality of your ingredients and the temperature of your pan.
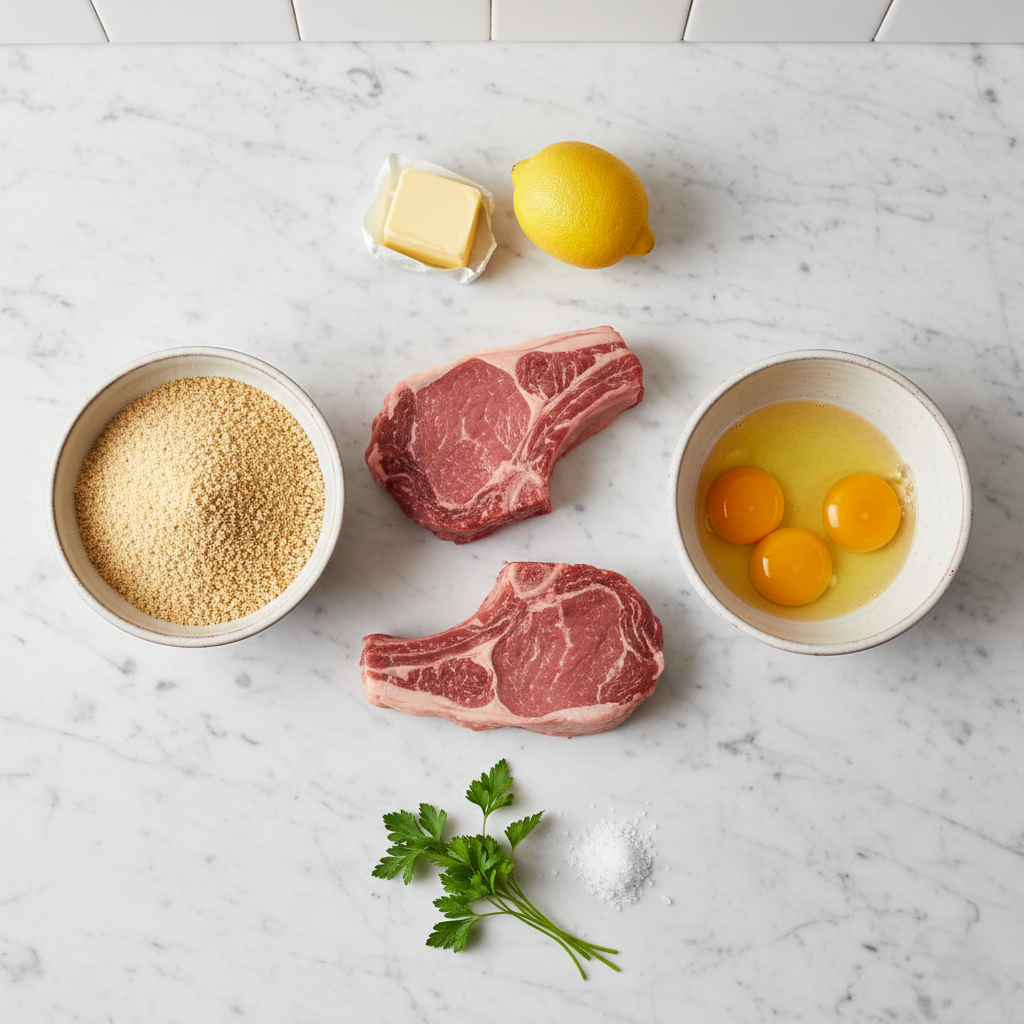
Ingredients
The Star:
- 2 Veal Chops (Bone-in): Look for chops that are about 1 inch (2.5 to 3 cm) thick. The bone is essential for flavor and moisture retention.
The Breading Station:
- 2 Large Eggs: Organic or free-range for a rich, yellow yolk.
- 2 cups (200g) Breadcrumbs: Ideally, make your own by blitzing stale white bread (crusts removed). Avoid “Panko” if you want 100% authenticity, though they work in a pinch.
- 1/2 cup (60g) All-Purpose Flour: For dusting.
The Frying Medium:
- 1.5 cups (350g) Unsalted Butter: To be clarified (see instructions). Alternatively, buy a jar of high-quality Ghee.
The Finish:
- Sea Salt Flakes: Maldon or similar, for crunch.
- 1 Lemon: Cut into wedges.
Equipment Needed
- Meat Mallet: For gently evening out the meat (optional).
- 3 Shallow Bowls: For the breading station.
- Large Skillet: Stainless steel or cast iron is best for heat retention.
- Wire Rack: To rest the meat so the bottom doesn’t get soggy.
- Kitchen Knife: A sharp small knife for cleaning the bone.
Step-by-Step Instructions
Phase 1: Prep the Meat (The “Frenching” Technique)
- Clean the Bone: To get that professional restaurant look, use your small knife to scrape the rib bone completely clean of meat and fat. This is called “Frenching.” It prevents the bone from burning and looks elegant.
- Prevent Curling: Use your knife to make small nicks around the edges of the meat, specifically cutting through the thin silverskin. This prevents the chop from curling up into a cup shape when it hits the hot heat.
- Light Pounding: If the meat is uneven, place it between two sheets of plastic wrap and gently tap it with the flat side of a meat mallet. Do not pulverize it; we want a thick steak, not a pancake.
Phase 2: The Breading Station
- Set Up: Line up your three bowls.
- Bowl 1: Flour.
- Bowl 2: Eggs (Beaten lightly with a fork. Do not add salt yet!).
- Bowl 3: Breadcrumbs.
- The Dip:
- Take a chop and dust it in the flour. Shake off the excess vigorously. You only want a ghostly white veil, not a thick layer.
- Dip it into the beaten eggs. Ensure every millimeter is wet.
- Lay it into the breadcrumbs. Here is the secret: Press down firmly with your palm. You want the crumbs to adhere tightly to the meat. Flip and press again.
- Tip: Do not let the breaded meat sit for too long, or the breading will get soggy. Cook immediately if possible.
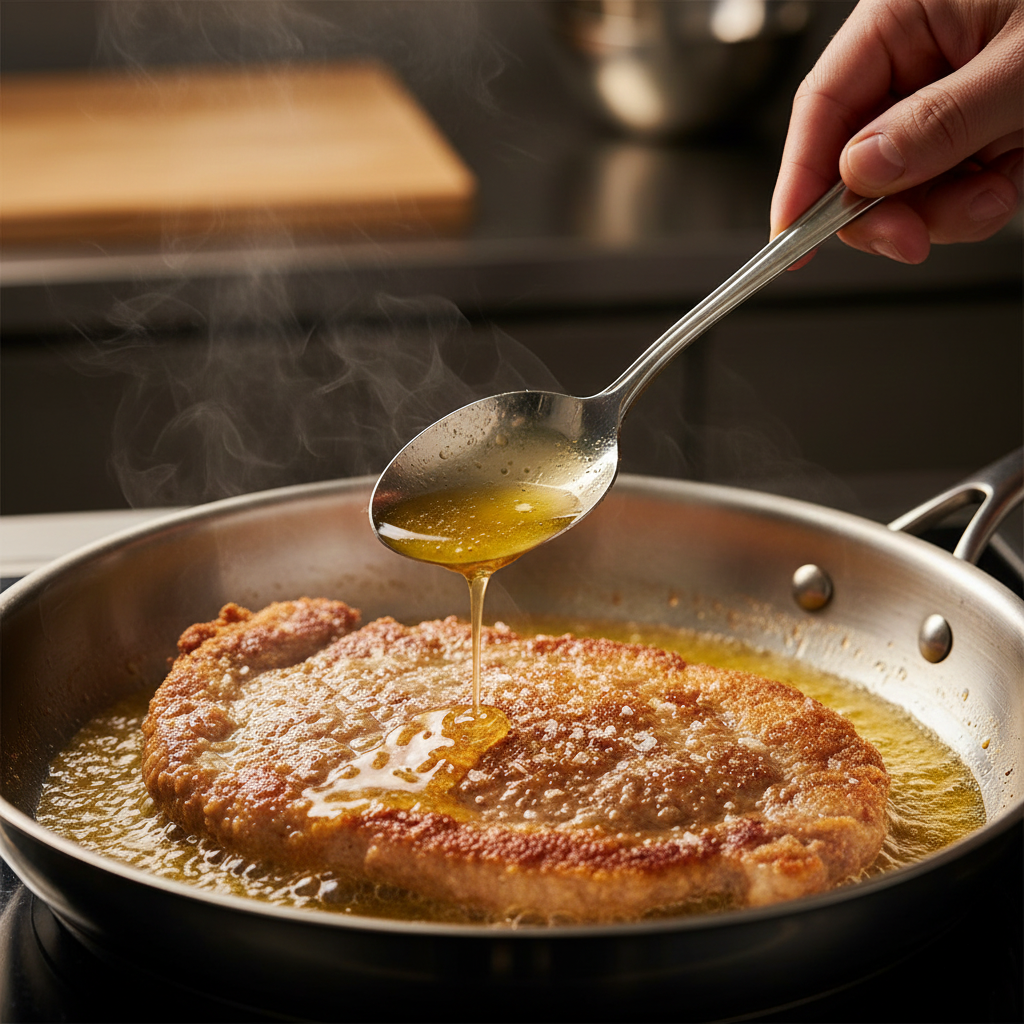
Phase 3: The Clarified Butter
- Clarify (If using regular butter): Melt the butter in a saucepan over low heat. Let it bubble gently. The white foam will float to the top, and milk solids will sink to the bottom. Skim off the top foam. Carefully pour the clear golden liquid into your skillet, leaving the milky white solids at the bottom of the saucepan (discard those).
- Heat it Up: Heat the clarified butter in your large skillet over medium-high heat. You need enough butter to come halfway up the side of the chop.
Phase 4: The Fry
- The Sizzle: When the butter is shimmering and hot (drop a crumb in; if it sizzles immediately, it’s ready), carefully lay the chops in the pan. lay them away from you to avoid splashing hot fat.
- Golden Patience: Cook for about 4 to 6 minutes on the first side. Do not peek constantly! You want a deep, golden-brown crust.
- The Flip: Turn the chop over. Cook for another 4 to 6 minutes.
- Basting: Tilt the pan slightly and use a spoon to scoop the hot, nutty butter and bathe the bone and the edges of the meat. This ensures even cooking.
- Doneness: For a traditional pink center, you are looking for an internal temperature of about 130°F to 135°F (55°C–57°C).
Phase 5: Rest and Serve
- Resting: Move the chops to a wire rack set over a baking sheet. Let them rest for 5 minutes. This allows the juices to redistribute so they don’t run out when you cut into it.
- Season: Now is the time to salt. Sprinkle generously with flaky sea salt.
- Serve: Plate immediately with a wedge of lemon. The acidity of the lemon is not optional; it balances the rich fatty butter perfectly.
Chef’s Tips for Success
- The “No Salt” Rule: Never salt the eggs or the meat before breading. Salt draws out moisture, which will get trapped between the meat and the breading, causing the crust to detach and fall off while frying. Always salt at the very end.
- The Breadcrumb Hack: If you want an extra savory crust, mix a tablespoon of grated Parmesan cheese into your breadcrumbs. It’s not 100% traditional, but it is 100% delicious.
- Room Temperature Meat: Take your veal out of the fridge 30 minutes before cooking. If you fry cold meat, the center will remain raw while the outside burns.
- Clarified Butter is King: Can you use oil? Technically, yes. But you will lose the signature flavor of the Milanese dish. If you can’t clarify butter, use a 50/50 mix of butter and vegetable oil to prevent burning.
FAQ: Common Questions
Q: Can I use chicken or pork instead of veal? A: Absolutely! While it won’t be a “Cotoletta alla Milanese” (which requires veal), this technique works beautifully with a bone-in pork chop or a chicken breast. Just adjust your cooking times accordingly to ensure they are fully cooked.
Q: Why does my breading fall off when I flip the meat? A: This usually happens for two reasons: either you added salt too early (drawing out moisture), or the oil wasn’t hot enough, causing the meat to steam instead of fry. Keep the heat medium-high and salt only after cooking.
Q: Can I make these ahead of time? A: Fried foods are best enjoyed fresh. However, you can bread the cutlets and keep them in the fridge for up to 4 hours before frying. If you must reheat a cooked chop, use an oven at 350°F (175°C) on a wire rack—never use a microwave, or it will become soggy.
Q: How do I store leftovers? A: Store in an airtight container in the refrigerator for up to 2 days. The crust won’t be as crispy, but the meat makes for a fantastic sandwich the next day!
Q: Is the meat supposed to be pink inside? A: Yes! A traditional Milanese chop is often served slightly pink (medium) in the center. Because it is whole-muscle meat (not ground), it is safe to eat this way and results in a much more tender texture.
Buon appetito!
Leave a Comment