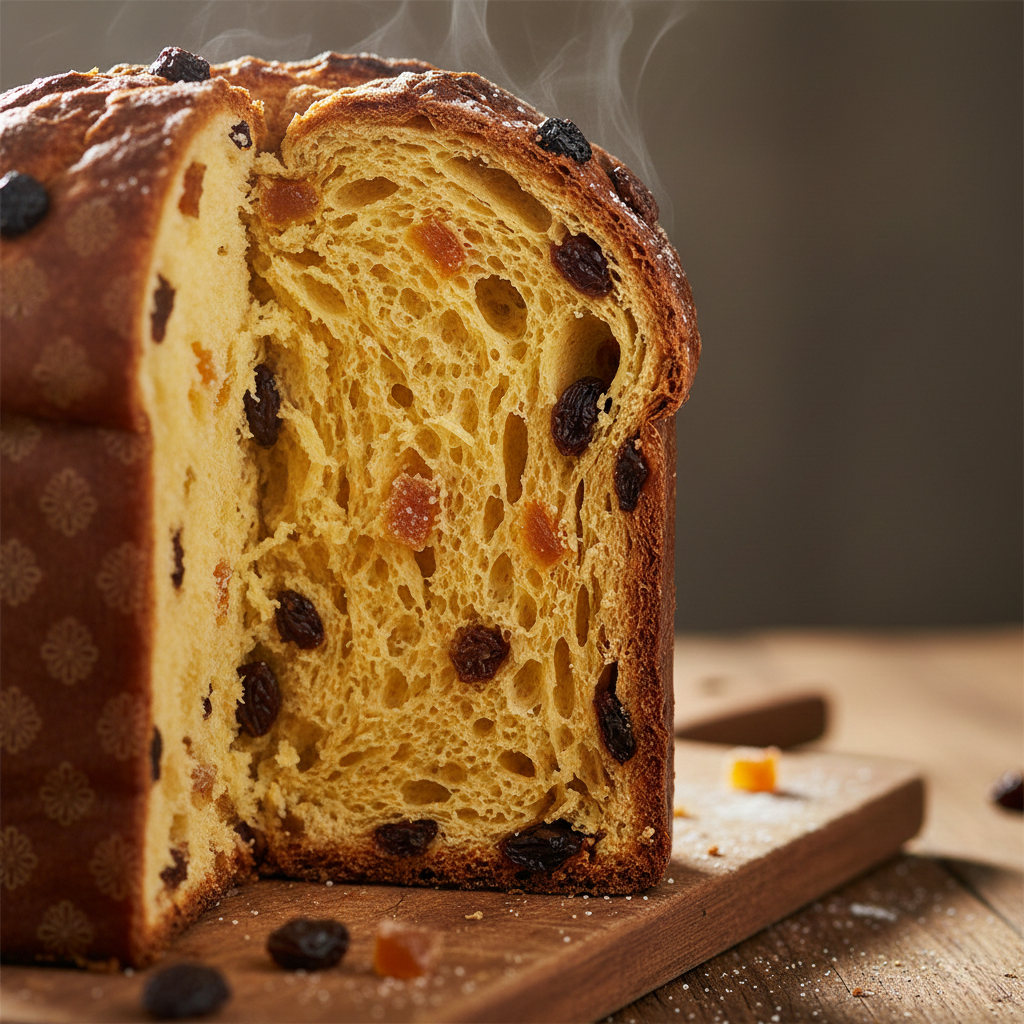
Imagine a bread so light it feels like a cloud in your hands, yet so rich with butter and egg yolks that it melts on your tongue like a pastry. The kitchen fills with the intoxicating aroma of vanilla bean, floral honey, and zesty citrus, signaling that something truly magical is happening in the oven. This isn’t just bread; this is Panettone.
Often misunderstood as merely “fruitcake’s Italian cousin,” real Panettone is a masterpiece of baking engineering. It is a sweet, cylindrical loaf that hails from Milan, standing tall and proud, capped with a dark, golden dome. While the supermarket versions often taste dry and industrial, a homemade Panettone is a revelation—shreddable, moist, and perfumed with the holidays.
If you have ever been intimidated by this “Mount Everest of Baking,” fear not. We are going to break this down, step by step. Put on your apron, grab your rolling pin, and let’s create a new holiday tradition.
The Spirit of the Season
Why This Recipe Is A Must-Try
You might ask, “Why spend two days making bread I can buy in a box?” The answer lies in the texture. Industrial Panettone relies on preservatives to stay soft for months. Your Panettone relies on hydration, high-quality butter, and natural fermentation.
The result is a texture that pulls apart in long, feathery strands—a characteristic known to Italian bakers as the filante structure. This recipe is for the baker who wants to conquer a challenge. It is for the person who finds joy in watching a heavy, sticky dough transform into a silky, living thing. It is the ultimate “I made this” statement piece for your holiday table.
The Hidden Benefits
Beyond the bragging rights, making Panettone at home offers incredible value.
- Cost-Effectiveness: An artisanal, bakery-quality Panettone can cost upwards of 40to60. This recipe uses pantry staples—flour, eggs, sugar—costing a fraction of the price.
- Technique Mastery: You will learn about enriched doughs. You will understand how fat (butter and yolks) interacts with gluten. Once you master this, brioche, challah, and babka will feel like child’s play.
- Nutritional Control: You decide the quality of the ingredients. No artificial flavorings, no unpronounceable preservatives—just pure, honest food.
A Milanese Legend
Food is history on a plate. Legend has it that Panettone was born in the court of Ludovico il Moro, the Duke of Milan, during a Christmas Eve banquet. The chef burned the dessert, and a young kitchen boy named Toni offered up his own morning sweet bread made with leftovers—flour, eggs, sugar, raisins, and candied fruit. The Duke loved it and named it Pane de Toni (Toni’s Bread).
Whether the legend is true or not, baking this connects you to centuries of Italian families who treat this process as a sacred ritual. It is a labor of love, meant to be torn apart by hand and shared with coffee or a glass of sweet wine.
How to Bake the Perfect Panettone
Yields: 1 Large Panettone (1kg / 2.2 lbs) or 2 Smaller ones (500g each)
Prep Time: 1 hour (active)
Rise Time: 12–18 hours (divided)
Bake Time: 45–55 minutes
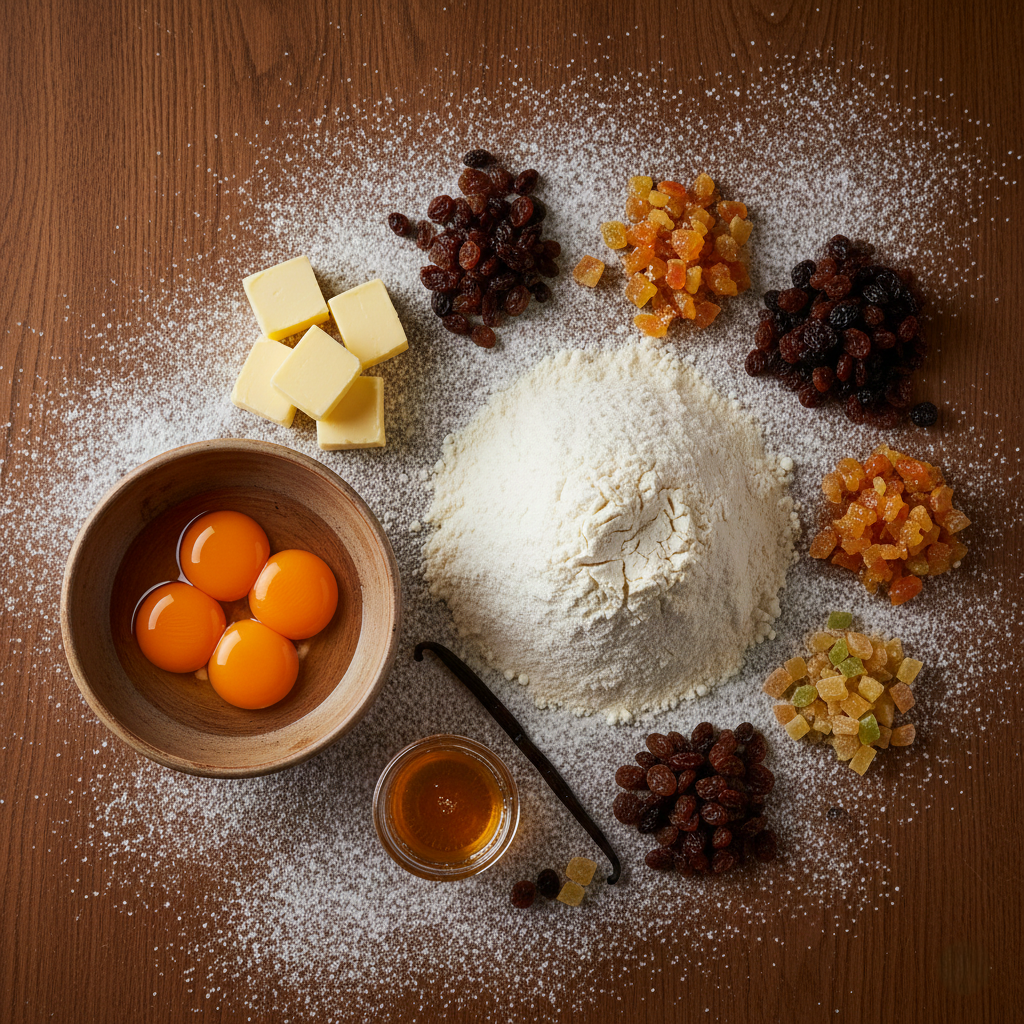
Ingredients Profile
The Starter (Biga/Sponge):
- 100g (3/4 cup) All-Purpose Flour (Note: Use a high-protein brand like King Arthur if possible)
- 70ml (1/3 cup) Warm Water (100°F/38°C)
- 1/4 tsp Active Dry Yeast
The Dough:
- 400g (3 1/3 cups) All-Purpose Flour
- 7g (2 1/4 tsp) Active Dry Yeast (1 packet)
- 60ml (1/4 cup) Warm Water
- 120g (1/2 cup + 1 tbsp) Granulated Sugar
- 150g (2/3 cup) Unsalted Butter, softened to room temperature (vital!)
- 5 Large Egg Yolks (save the whites for an omelet!)
- 1 Whole Egg
- 1 tsp Vanilla Extract (or the seeds of 1 vanilla bean)
- 1 tbsp Honey (adds moisture and helps preservation)
- 1 tsp Salt
- Zest of 1 Lemon and 1 Orange
The Jewels (Add-ins):
- 120g (3/4 cup) Raisins / Sultanas
- 100g (1/2 cup) Candied Orange Peel, diced finely
- Optional: 2 tbsp Rum or warm water (for soaking raisins)
Equipment Needed
- Stand Mixer: With a dough hook attachment (Making this by hand is possible but physically exhausting).
- Panettone Paper Mold: 6-inch or 7-inch diameter (Available online or at specialty kitchen stores).
- Long Metal Skewers: Knitting needles work too.
- Digital Scale: Highly recommended for accuracy.
- Kitchen Thermometer.
Step-by-Step Instructions
Phase 1: The Starter (The Night Before)
- Mix the Sponge: In a small bowl, dissolve the tiny amount of yeast (1/4 tsp) in the warm water. Stir in the 100g of flour. It will be thick and sticky.
- Sleep: Cover with plastic wrap and let it sit at room temperature for 8 to 12 hours. It should bubble up and become sponge-like. This develops flavor and strengthens the gluten structure.
Phase 2: Mixing the Dough
- Wake Up the Yeast: The next day, in the bowl of your stand mixer, dissolve the remaining 7g of yeast in the 60ml warm water with a pinch of the sugar. Let it foam for 5 minutes.
- Initial Mix: Add the overnight starter (sponge) to the yeast water. Add the whole egg, egg yolks, vanilla, honey, and citrus zests. Mix briefly with the paddle attachment to break up the sponge.
- Flour Power: Switch to the dough hook. Add the remaining flour and sugar. Mix on low speed until a shaggy mass forms.
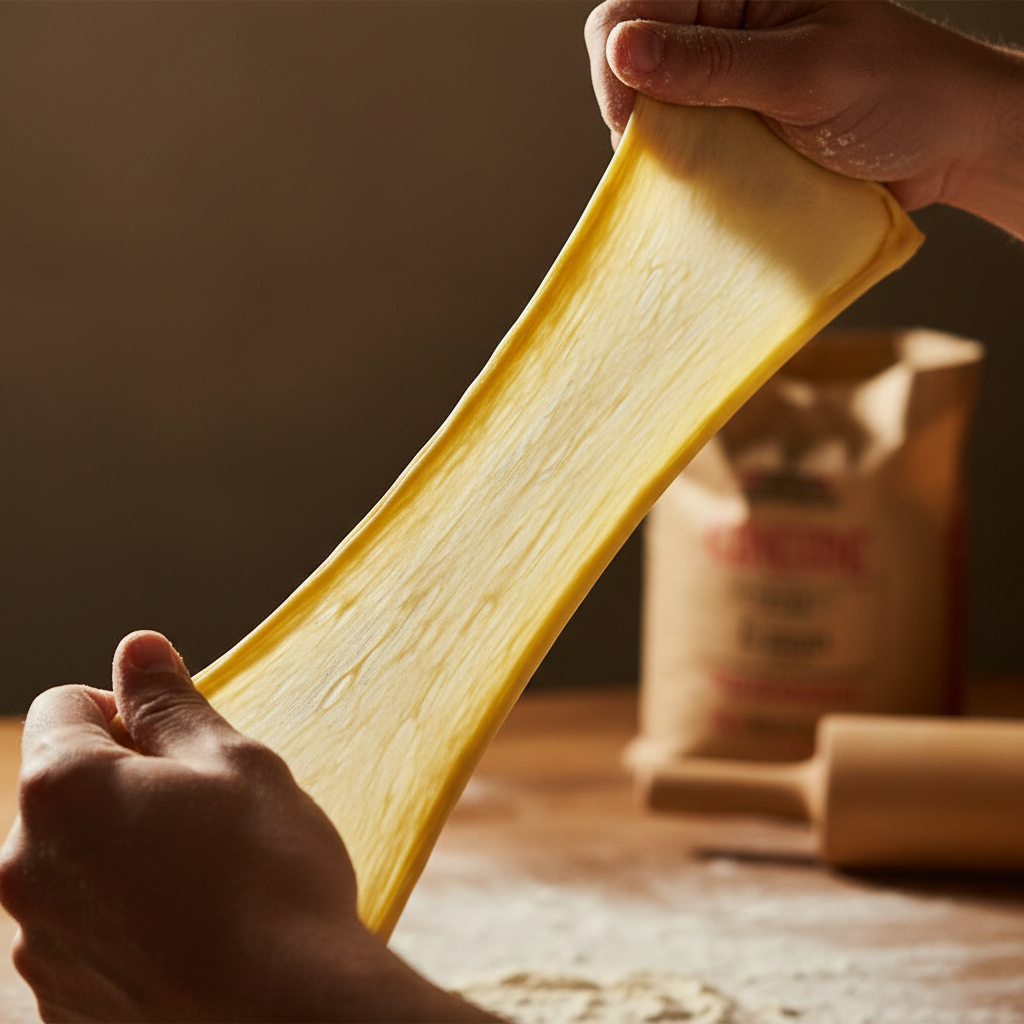
- Develop Gluten: Turn the speed to medium-low and knead for about 5-8 minutes. The dough should start pulling away from the sides of the bowl.
- The Butter Integration (Crucial Step): This requires patience! Add the softened butter one tablespoon at a time. Wait until each piece is fully absorbed before adding the next. If you rush, the dough will become a greasy mess. Add the salt with the final piece of butter.
- The Windowpane Test: Knead for another 5-10 minutes. Stop the mixer and grab a piece of dough. Stretch it gently. It should stretch thin enough to let light through without tearing (like a windowpane). If it tears, knead more.
Phase 3: The Fruit & First Rise
- Add the Jewels: Drain your soaked raisins thoroughly (pat them dry with a paper towel—excess water kills dough). Add the raisins and diced candied orange peel. Mix on the lowest speed for 30-60 seconds just to distribute them.
- The First Rise: Form the dough into a ball. Place it in a lightly greased bowl. Cover and let it rise in a warm, draft-free spot until it has tripled in volume. This takes time—usually 3 to 5 hours depending on your kitchen’s warmth.
Phase 4: Shaping & Second Rise
- Shape: Turn the dough onto a clean surface (avoid adding extra flour if possible). Fold the dough over itself a few times to create tension. Shape it into a tight ball.
- Mold It: Drop the dough ball into your paper Panettone mold.
- The Long Wait: Cover loosely with a plastic bag (create a “tent” so it doesn’t touch the dough). Let it rise until the dough reaches the very top rim of the mold. This can take 2 to 4 hours. Do not rush this.
Phase 5: Bake & The Gravity Trick
- Preheat: Preheat your oven to 350°F (175°C).
- Score: Using a very sharp knife or razor blade, cut a shallow “X” on top of the dough. Place a tiny pat of cold butter in the center of the X.
- Bake: Place the mold on a baking sheet on the lower rack of the oven. Bake for 45–55 minutes.
- Check: If the top gets too dark too fast, tent it with aluminum foil after 25 minutes.
- Done? A thermometer inserted into the center should read 195°F (90°C).
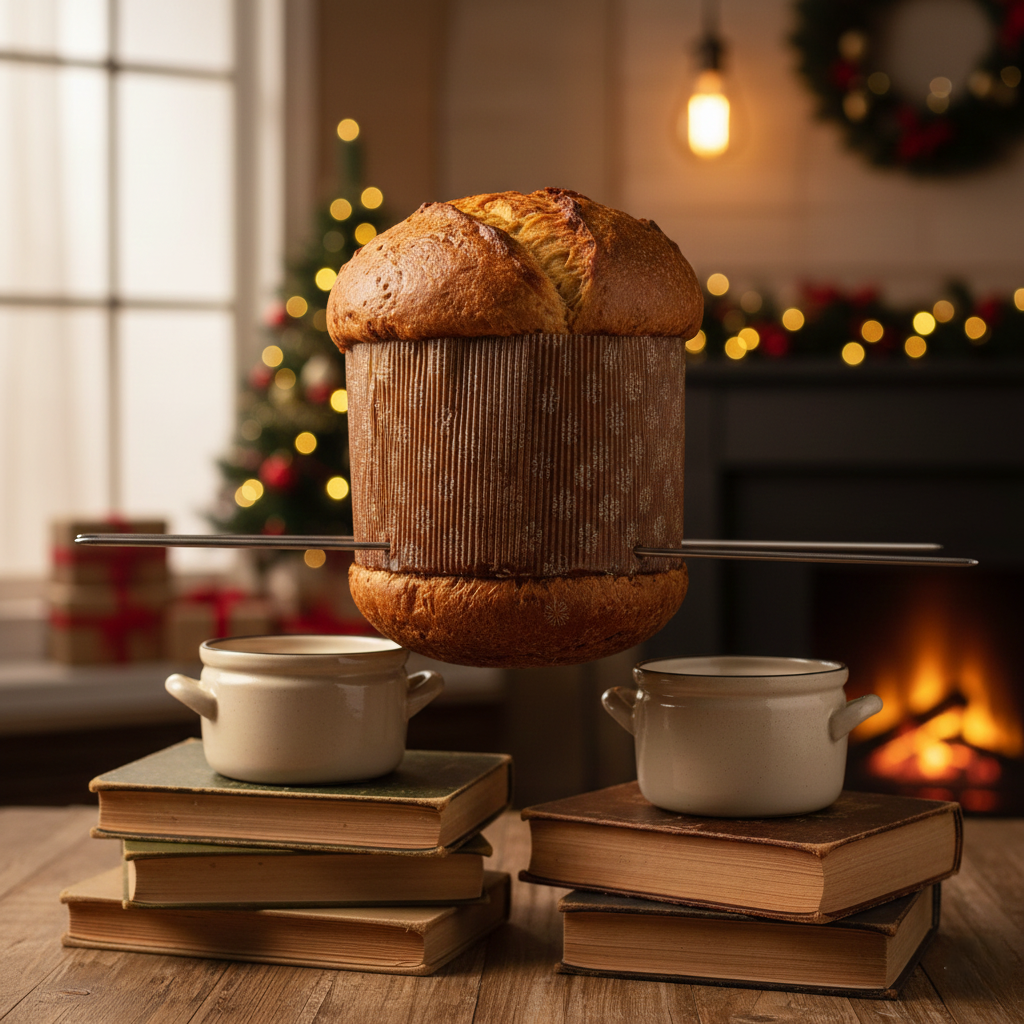
- The Inversion: This is the secret to Panettone! Immediately upon removing from the oven, pierce the bottom of the mold with two long skewers (about 1 inch from the bottom). Flip the Panettone upside down and balance the skewers between two chairs or large pots.
- Cool: Let it hang upside down until completely cool (at least 3 hours). This prevents the heavy, buttery bread from collapsing under its own weight.
Chef’s Tips for Success
- Butter Temperature: Your butter must be soft and pliable, same consistency as the dough, but not melted. If it’s oily, put it in the fridge for 10 minutes.
- The “Yellow” Factor: For that iconic golden color, try to find eggs with deep orange yolks (often sold as “pasture-raised”).
- Don’t Rush the Rise: Panettone is 10% mixing and 90% waiting. If your kitchen is cold, put the dough in the oven with just the light turned on.
- Soak the Fruit: Soak your raisins in hot water (or rum!) for 30 minutes, then drain and dry them completely. Wet fruit creates pockets of steam that can ruin the dough structure.
Frequently Asked Questions
Can I make this without a paper mold?
Yes, but it won’t have the traditional tall shape. You can use a deep cake tin (lined with parchment paper that extends 4 inches above the rim) or even a large, clean coffee tin lined with parchment.
Can I use chocolate chips instead of fruit?
Absolutely! This is a popular variation called Panettone al Cioccolato. Swap the raisins and peel for 1 cup of high-quality dark chocolate chunks. Freeze the chocolate chunks before adding them so they don’t melt into the dough during mixing.
Why does the dough take so long to rise?
Enriched doughs are heavy. The sugar and fat (butter/yolks) actually slow down the yeast activity. It’s a tradeoff: the fat creates the tenderness, but the yeast has to work harder to lift that weight. Patience is your most important ingredient.
How do I store the finished Panettone?
Once completely cool, wrap it tightly in plastic wrap or keep it in a large airtight bag. Because of the honey and fat content, it stays fresh at room temperature for up to a week. It actually tastes better on day two or three as the flavors meld!
What if I don’t have skewers to hang it?
If you absolutely cannot hang it, lay it on its side on a very soft pillow covered with a kitchen towel, turning it gently every 15 minutes. However, be warned: it may lose some of its height.
Conclusion
There is a specific moment of joy when you slice into a homemade Panettone. The knife slides through the golden crust, meeting almost no resistance from the airy interior. You see the honeycomb structure of the crumb, studded with jeweled fruits.
Making Panettone is a journey. It demands your attention, your patience, and your respect. But when you take that first bite—buttery, floral, and meltingly soft—you realize that you haven’t just baked a loaf of bread. You have crafted a memory.
So, gather your ingredients. Let the dough rise. Fill your home with the scent of an Italian Christmas. And when you finally share it, remember to tell the story of Toni, the kitchen boy who turned leftovers into a legend.
Are you ready to start your sponge tonight? Let me know if you need help finding the right flour!