Golden, Crispy Perfection: The Ultimate Authentic Thai Spring Rolls (Por Pia Tod)

Imagine standing in the middle of a bustling Bangkok night market. The air is thick with humidity and the intoxicating aroma of sizzling garlic, caramelized pork, and hot oil. You hear a rhythmic hiss as dough hits the wok, followed by the distinctive clack-clack of a metal spider strainer hitting the side of a pan. You aren’t just hungry; you are ready to devour something spectacular.

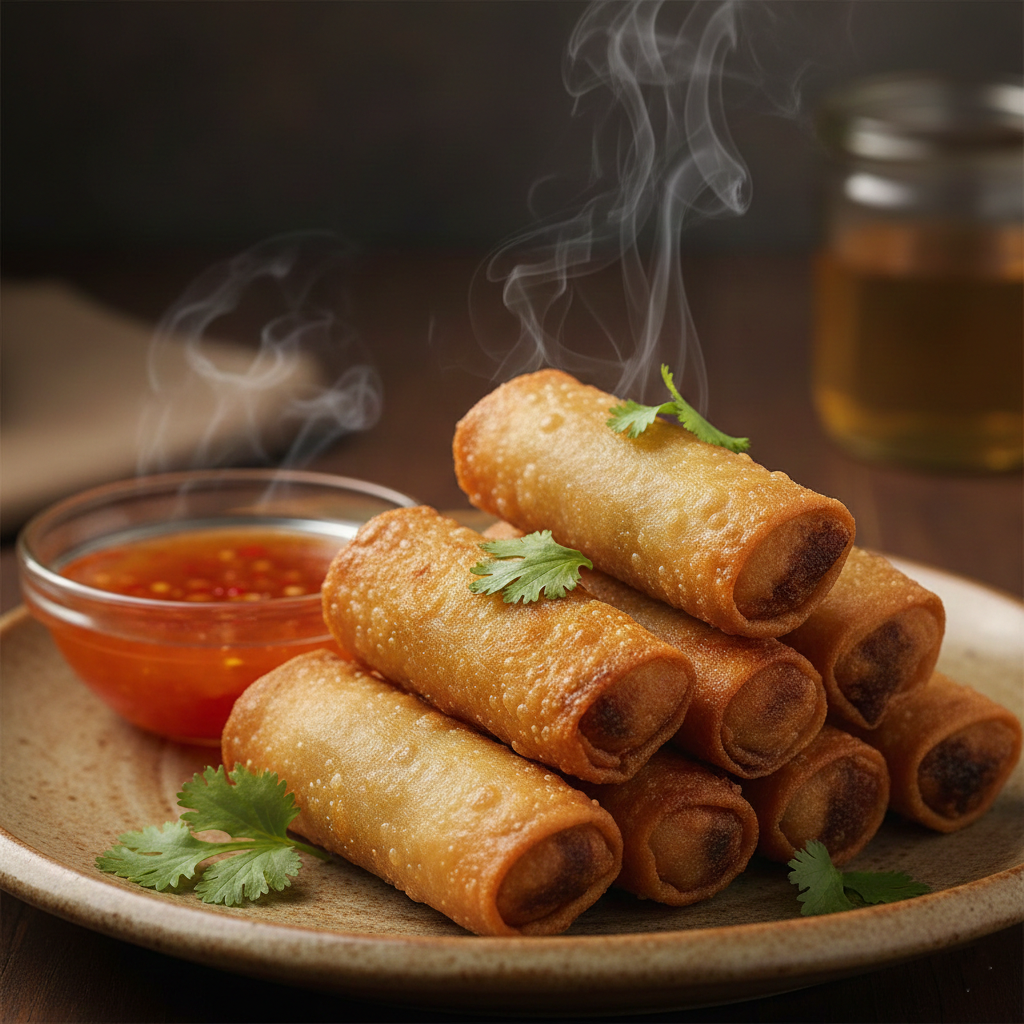
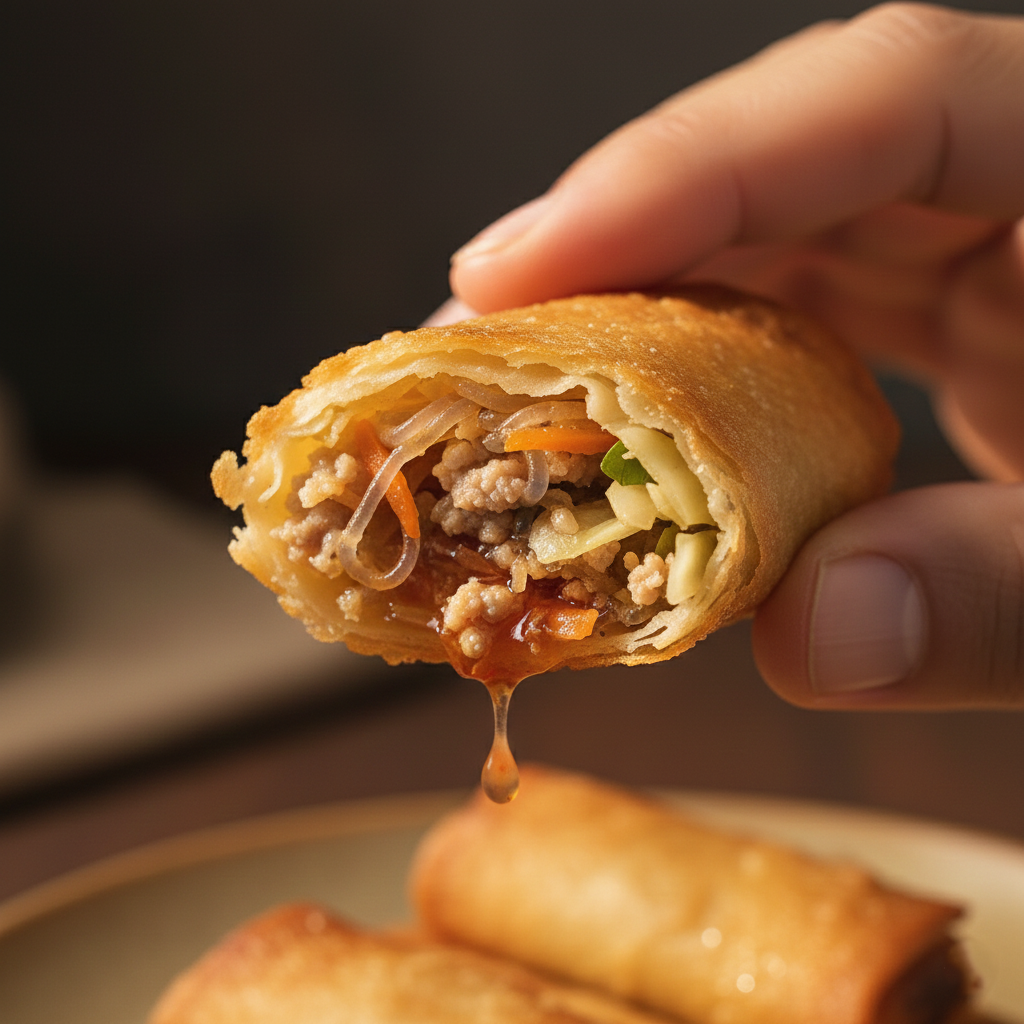
This is the home of Por Pia Tod, the beloved Thai Spring Roll. Unlike the fresh, gummy texture of summer rolls, these are deep-fried to shattering, golden perfection. They are the ultimate street food indulgence—a crunchy exterior hiding a steaming, savory treasure trove of glass noodles, tender pork, and crisp vegetables.

Today, we aren’t just cooking; we are transporting your kitchen to Thailand. Grab your apron. It’s time to make the crispiest, most addictive spring rolls you’ve ever tasted.

Why You Will Fall In Love With This Recipe

Let’s be honest: takeout spring rolls are often a disappointment. They arrive lukewarm, slightly soggy, and filled with a mysterious, flavorless cabbage mixture.

This recipe is the antidote to mediocre takeout.

The motivation here is pure textural bliss. When you bite into a homemade Por Pia Tod, the experience is multi-sensory. First, there is the audible crunch of the paper-thin wrapper shattering. Then, you hit the chewiness of the glass noodles and the savory richness of ground pork, seasoned deeply with soy and fish sauce. Finally, there is the freshness of the bean sprouts and carrots that keeps the bite from feeling too heavy.

This is comfort food at its finest. It is indulgent, greasy in the best possible way, and undeniably satisfying. Whether you are hosting a party or just treating yourself on a Friday night, these rolls are a guaranteed crowd-pleaser.

Fresh raw ingredients including glass noodles, ground pork, cabbage and wrappers

The Art of the Roll: Technique and Benefits

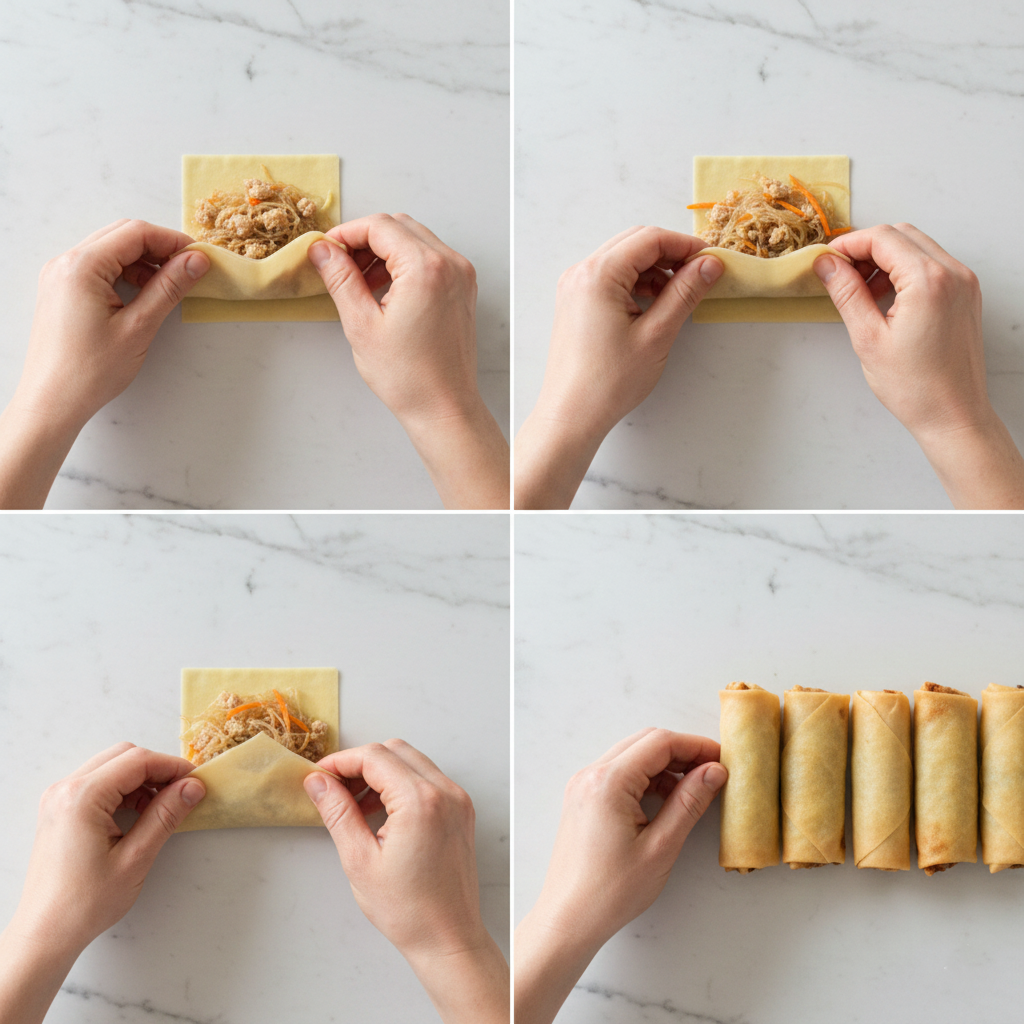
Beyond just a delicious snack, this recipe offers significant culinary value. You are going to master the art of moisture control and wrapping technique.

The Culinary Science

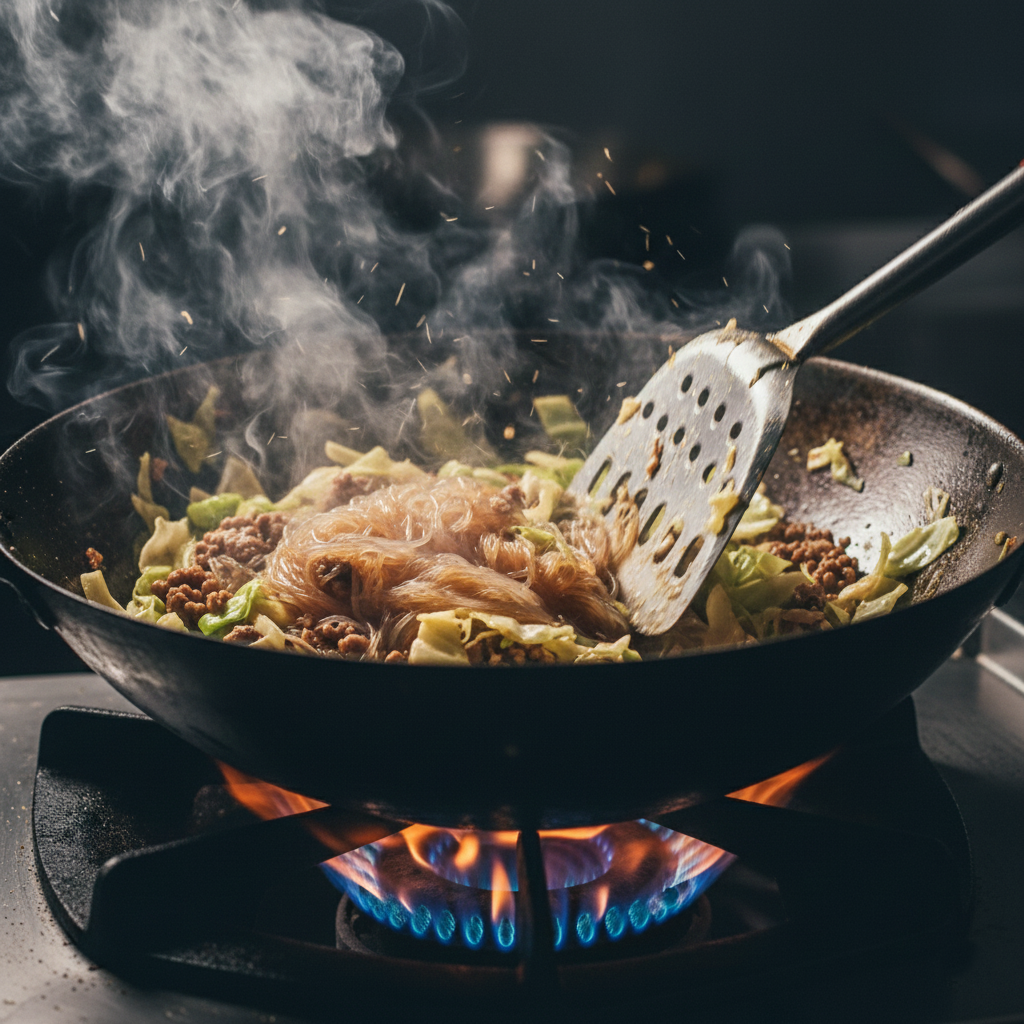
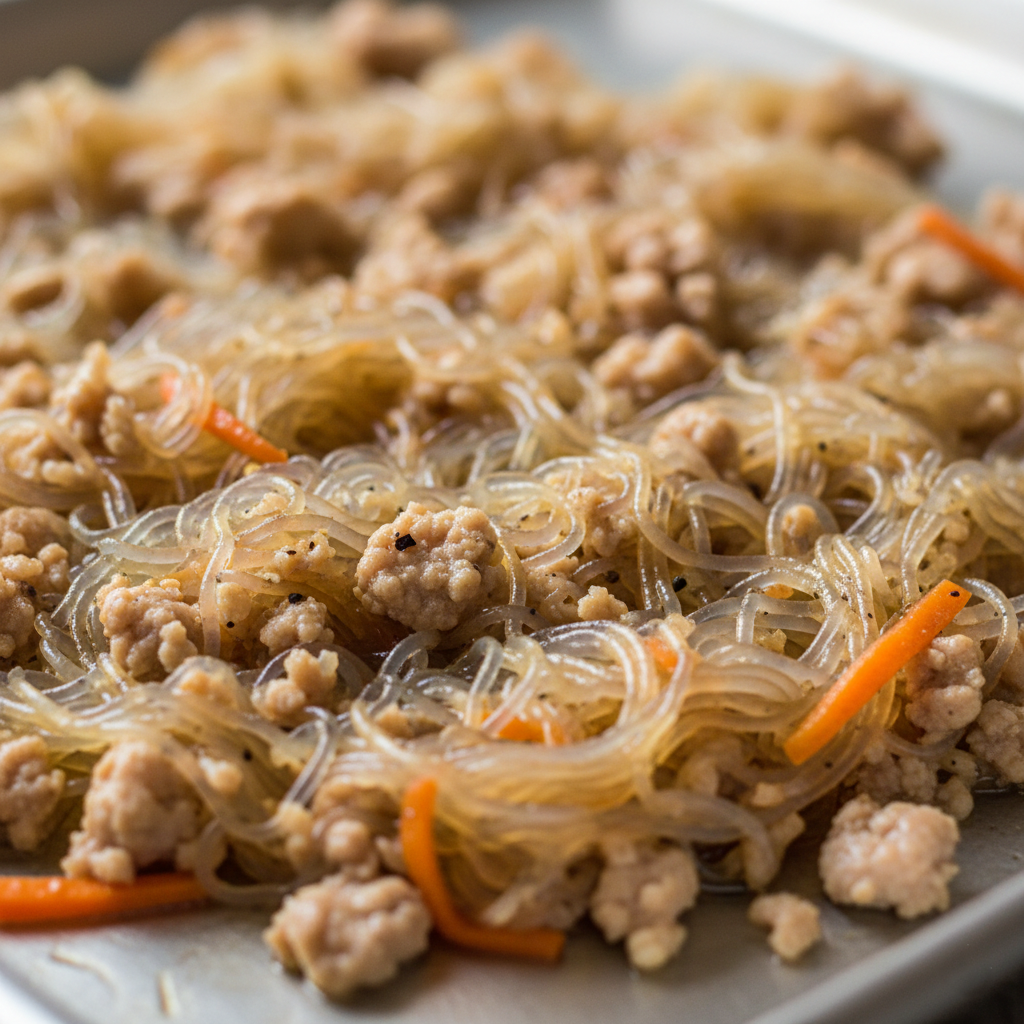
The secret to a spring roll that stays crispy is managing moisture. If your filling is too wet, the wrapper will steam from the inside out and burst in the fryer. In this guide, you will learn how to stir-fry the filling to the perfect level of dryness and why cooling the filling completely is the most critical step in the process.

Nutritional Note

While we are focusing on the “Indulgent” dietary theme (hello, deep frying!), there is balance here. The filling is packed with:

  • Cabbage and Carrots: High in fiber and Vitamin K.
  • Bean Sprouts: A great source of protein and Vitamin C.
  • Garlic: Known for its immune-boosting properties.

You control the quality of the oil and the freshness of the meat, making these significantly healthier than processed frozen versions found in grocery stores.

Street Food Roots: A Cultural Connection

Spring rolls (or Chun Juan) originated in China, but Thailand adopted them and gave them a distinct personality. In Thailand, Por Pia Tod is everywhere—from street carts to high-end restaurants.

The flavor profile is distinctly Thai thanks to the usage of Fish Sauce (Nam Pla) and the “Holy Trinity” of Thai cooking: garlic, cilantro roots (or stems), and white pepper. This mixture creates an aromatic base that differentiates these rolls from their Chinese or Vietnamese cousins.

Making spring rolls is also a communal activity. In many Thai households, one person separates the wrappers, another spoons the filling, and a third handles the frying. It is a dish that invites conversation, laughter, and anticipation. As you roll these today, imagine you are part of that long lineage of cooks sharing food with loved ones.

The Master Recipe: Por Pia Tod

Close up of sizzling wok with garlic pork and vegetables

Prep Time: 45 Minutes | Cook Time: 15 Minutes | Yields: 20–25 Rolls

The Ingredients

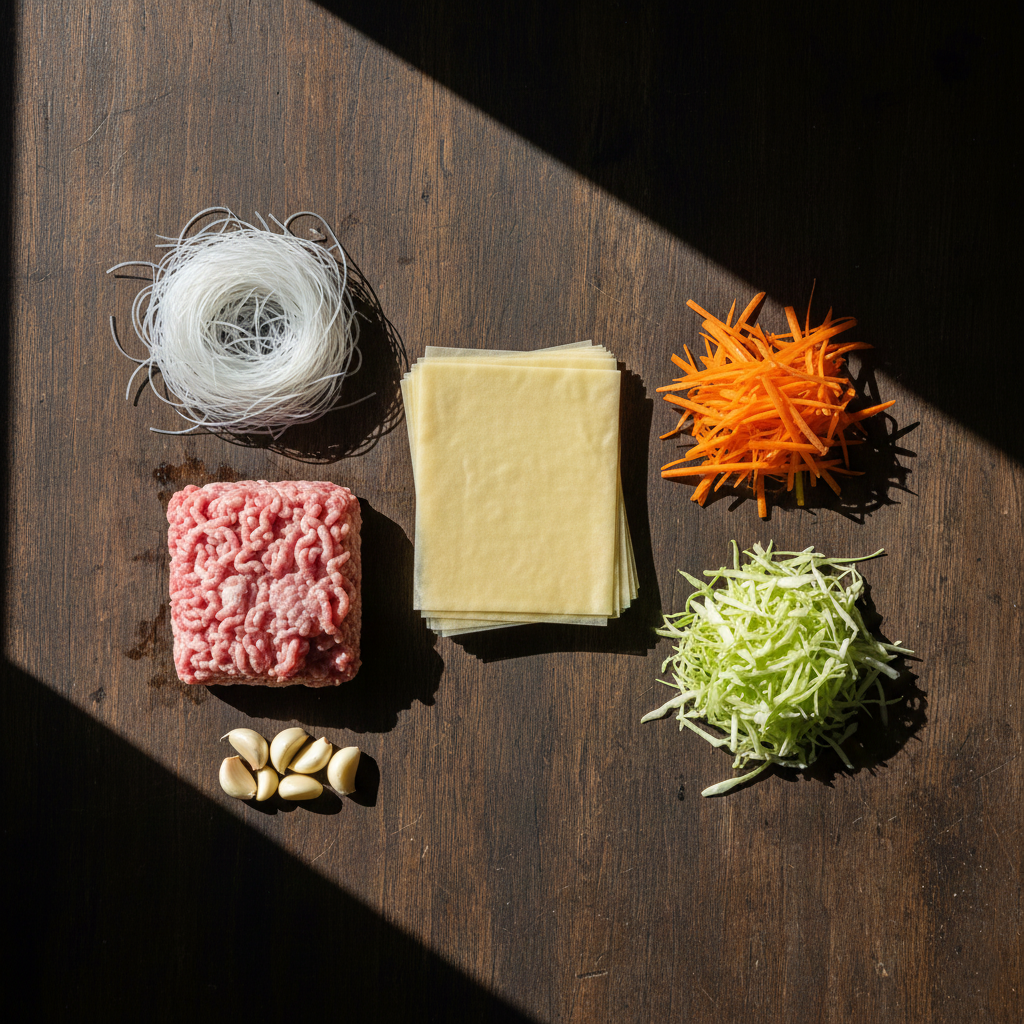
The Aromatics & Meat:

  • 2 tbsp Vegetable oil (for stir-frying)
  • 5 cloves Garlic, finely minced
  • 1 lb (450g) Ground Pork (you can use chicken or minced tofu for variety)
  • 1 tsp Ground White Pepper (Black pepper works, but white is traditional)

The Veggies & Noodles:

  • 2 cups Cabbage, thinly shredded (Green cabbage works best)
  • 1 large Carrot, julienned or grated
  • 3.5 oz (100g) Glass Noodles (Bean Thread Noodles), soaked in warm water for 10 minutes, drained, and cut into 2-inch lengths
  • 1 cup Bean Sprouts, fresh

The Seasoning Sauce:

  • 2 tbsp Oyster Sauce
  • 1 tbsp Light Soy Sauce
  • 1 tbsp Fish Sauce
  • 1 tsp Sugar (Palm sugar or white sugar)

The Wrapper & Glue:

  • 1 package (25 sheets) Frozen Spring Roll Wrappers (thawed)
  • 1 large Egg, beaten (or a paste made of 1 tbsp flour and 1 tbsp water)
  • 4 cups Neutral Oil for deep frying (Canola, Vegetable, or Peanut oil)

Equipment Needed

  • Large Wok or Deep Skillet
  • Baking sheet (for cooling filling)
  • Deep pot or Dutch oven (for frying)
  • Kitchen thermometer (optional but helpful)
  • Wire rack or paper towels

Step-by-Step Instructions

Phase 1: The Flavorful Filling

  1. Soak the Noodles: Place your glass noodles in a bowl of warm water. Let them sit for about 10–15 minutes until they are soft and translucent. Drain them thoroughly and use scissors to snip them into manageable 2-inch pieces.
  2. Sizzle the Aromatics: Heat 2 tablespoons of oil in your wok over medium-high heat. Toss in the minced garlic. Stir quickly! You want it golden and fragrant, not burnt. The smell should be intense and appetizing.
  3. Cook the Meat: Add the ground pork. Break it up with your spatula, ensuring there are no large clumps. Cook until the pork changes from pink to white.
  4. Vegetable Crunch: Toss in the shredded cabbage and carrots. Stir-fry for 2–3 minutes. You want them to wilt slightly but retain some crunch. Add the cut glass noodles and the bean sprouts last (bean sprouts release water, so we add them at the end to keep things dry).
  5. Season to Perfection: Pour in the oyster sauce, soy sauce, fish sauce, sugar, and white pepper. Toss everything vigorously. The noodles will soak up that savory sauce, turning a beautiful light brown.
    • Chef’s Check: There should be no liquid pooling at the bottom of the wok. If there is, keep cooking until it evaporates.
  6. The Cool Down: Transfer the filling to a large baking sheet and spread it out. Let it cool completely.
    • Crucial Step: If you wrap hot filling, the steam will tear the wrapper and make your rolls soggy. Patience is key here!

A tray of cooked filling with glass noodles pork and carrots cooling down

Phase 2: The Perfect Roll

  1. The Setup: Place a spring roll wrapper on a clean surface like a diamond (one corner pointing at you). Keep the other wrappers covered with a damp cloth so they don’t dry out.
  2. The Fill: Place about 2 tablespoons of the cooled filling on the lower third of the wrapper (the corner nearest you).
  3. The Tuck: Lift the bottom corner up and over the filling. Tuck it in tight, like you are swaddling a baby. Roll it halfway up.
  4. The Fold: Fold the left and right corners into the center. It should now look like an open envelope.
  5. The Seal: Brush the top corner with the beaten egg (or flour paste). Continue rolling upwards until the cylinder is sealed tight. Repeat until all filling is used.

Step by step collage of how to roll a spring roll

Phase 3: The Golden Fry

  1. Heat the Oil: Pour oil into your heavy-bottomed pot (about 2-3 inches deep). Heat it to 350°F (175°C). If you don’t have a thermometer, stick a wooden chopstick into the oil. If tiny bubbles form around the wood immediately, you are ready.
  2. The Swim: Carefully slide 4–5 rolls into the oil. Do not overcrowd the pot, or the temperature will drop, and the rolls will become greasy.
  3. The Transformation: Fry for 3–5 minutes, turning them occasionally. Watch as the pale wrappers transform into a bubbly, golden-brown crust.
  4. Drain: Remove with a slotted spoon or spider strainer. Place them vertically in a colander lined with paper towels (standing them up helps drain excess oil better than laying them flat).

Chef’s Tips for Success

  • The “Glue” Matters: Make sure your egg wash or flour paste seals the very edge of the wrapper tightly. If there is a gap, oil will seep inside, and the filling will spill out.
  • Don’t Overstuff: It is tempting to pack them full, but overstuffed rolls are hard to seal and likely to burst. Less is more.
  • Wrapper Management: Spring roll wrappers dry out incredibly fast. Always keep the stack covered with a slightly damp kitchen towel while you are working.
  • Serve Immediately: These are best eaten within 10 minutes of frying for maximum crunch. Serve with Nam Jim Buay (Thai sweet plum sauce) or sweet chili sauce.

Frequently Asked Questions (FAQ)

Q: Can I make these vegetarian? A: Absolutely! Simply omit the ground pork and replace it with minced tofu or shiitake mushrooms. Swap the fish sauce and oyster sauce for mushroom stir-fry sauce or a vegetarian oyster sauce alternative.

Q: My spring rolls turned out soggy. What went wrong? A: This usually happens for two reasons: either the oil wasn’t hot enough (so the wrapper absorbed oil instead of crisping up), or your filling was too wet. Ensure your filling is dry and your oil is at 350°F.

Q: Can I freeze these before frying? A: Yes, this is a great make-ahead tip! Place the uncooked rolled spring rolls on a baking sheet (not touching) and freeze until solid. Then transfer them to a freezer bag. You can fry them directly from frozen; just add an extra minute or two to the cooking time.

Q: How do I reheat leftovers? A: Do not microwave them! The microwave will turn the crispy shell into rubber. Reheat them in an oven or air fryer at 375°F for 5–8 minutes to restore the crunch.

Q: Can I bake them instead of deep frying? A: You can, but the texture will be different. If baking, brush the rolls generously with oil and bake at 400°F (200°C) for 20 minutes, flipping halfway through. They won’t be as flaky as the fried version, but they will still be tasty.

Conclusion: Take the Bite

A crispy spring roll bitten in half showing juicy filling and steam

Now that you have the knowledge, the technique, and the “crave factor,” the only thing left to do is cook.

Making Por Pia Tod is a labor of love, but the reward is instant. There is nothing quite like that first bite—the shattering crispness of the golden shell giving way to the savory, garlicky, tender filling. It’s a texture combination that defines Thai street food culture.

So, gather your ingredients, heat up that wok, and prepare to impress yourself. Once you master this recipe, you’ll never order takeout spring rolls again. Happy cooking!